
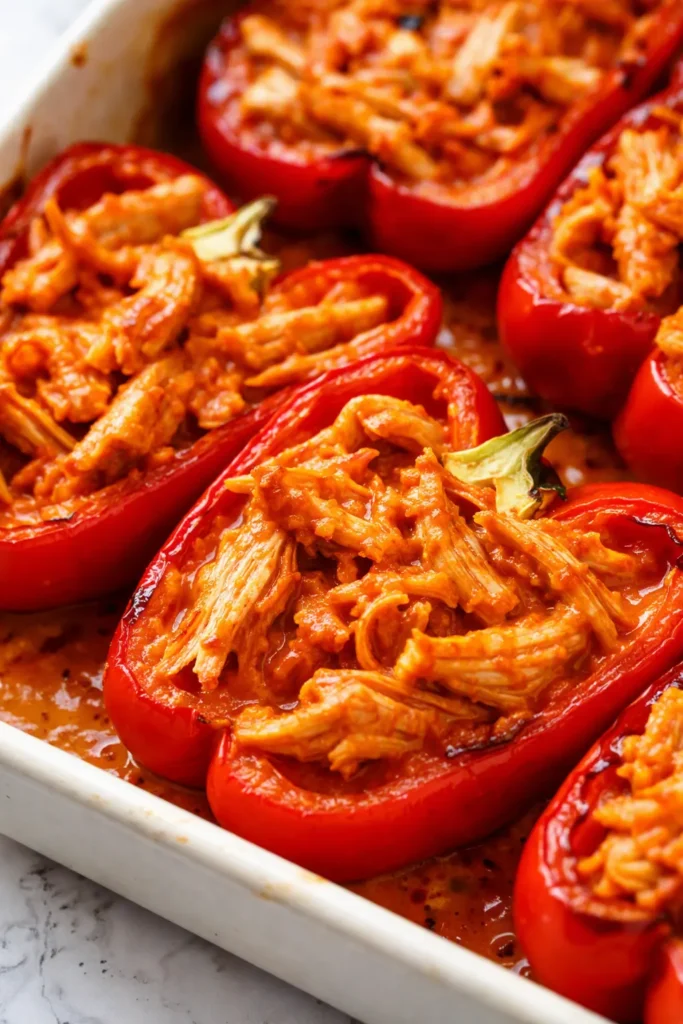
That first bite — where the spicy buffalo coating hits your tongue and the gooey cheese stretches all the way back to the plate — is the exact moment my family falls in love with these every single time. I’m not exaggerating when I say my nine-year-old, who once declared chicken “boring,” has asked for this dinner three Fridays in a row now. And honestly? I keep saying yes because they’re stupid-easy and the leftovers vanish from the fridge before lunch.
The short version: These come together in 20 minutes of actual hands-on work and taste like something you’d order from a sports bar, minus the sad wilted lettuce and the $14 price tag.
I’ve made this recipe at least thirty times over the past two years — through picky-eater phases, crazy work weeks, and one memorable night when I forgot the blue cheese entirely and we ate them anyway with ranch dressing. Still great.
- Serves: 4 as a main dish (2 pepper halves each)
- Hands-On Time: 20 min | Total Time: 45 min
- Difficulty: Easy enough for a weeknight — no fancy skills needed
- Cost per serving: About $3.50
- Calories: ~410 per serving
- Dietary Notes: Gluten-free and low-carb as written; dairy-free version works great too
(Photo above: overhead shot of four bright orange bell pepper halves filled with shredded chicken and melted cheese, arranged on a white ceramic baking dish, with a small bowl of blue cheese dip in the corner and a few celery sticks resting on the side. Warm natural light from a kitchen window, rustic wooden trivet underneath.)
Why My Version Stays Crispy Instead of Mushy
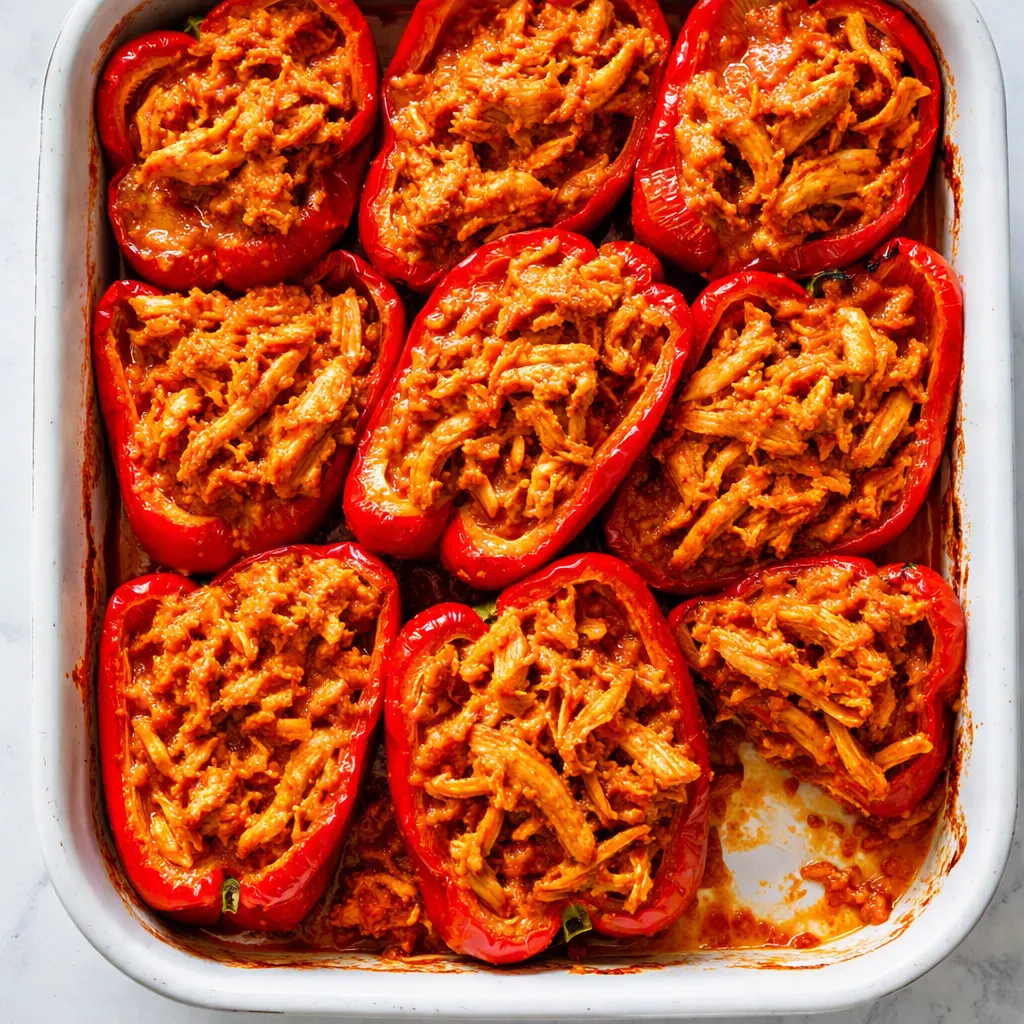
The problem with most stuffed pepper recipes is the same one I hit for years: you bake everything together, and the peppers release so much water that you end up with what tastes like chicken soup inside a green boat. Not terrible, but not the cheesy, spicy goodness you were dreaming about.
The fix? Two things. First, I always pre-roast the peppers for about 10 minutes BEFORE they get stuffed. That gives them a head start on softening and lets some of that extra moisture cook off before the filling goes in. I know it’s an extra step and I know you’re tired — but it’s 10 minutes of doing absolutely nothing while the oven works, and it changes everything.
Second, I toss the shredded chicken with the buffalo sauce and let it sit for a few minutes before stuffing. This lets the chicken soak up all that spicy flavor instead of the sauce pooling at the bottom of the dish. The result is a filling that’s bold and saucy, not watery, and peppers that actually hold their shape when you serve them.
Everything You Need (And a Few Notes From Me)
- 4 bell peppers (any color, but I prefer orange or red): They’re sweeter than green peppers, which balances the spicy buffalo sauce beautifully. My kids are weirdly suspicious of green peppers specifically, and orange ones don’t get the same side-eye. Pro tip: look for peppers with flat bottoms so they stand up straight in the baking dish — this is my #1 trick for pretty stuffed peppers.
- 2 cups cooked, shredded chicken (about 1½ pounds): This is the perfect recipe for a rotisserie chicken from Costco, or any leftover chicken you’ve got hanging around. I’ve used both white and dark meat and honestly the mix is best. On busy weeks I’ll grab a rotisserie chicken and shred the whole thing while I’m watching TV — fifteen minutes and I’ve got filling for tonight plus a salad for tomorrow’s lunch.
- ¾ cup buffalo sauce (like Frank’s RedHot — that’s what I use): This is the flavor backbone, so don’t cheap out here. Frank’s has the right tangy heat that doesn’t overwhelm everything else. My husband thinks I’m a purist about this, but I’ve tried other brands and they’re either too sweet or weirdly vinegary. Frank’s or nothing, I say.
- 4 oz cream cheese, softened: This is the secret to that creamy, luscious texture that makes the filling taste like the inside of a buffalo chicken dip. Make sure it’s truly soft — leave it out for 30 minutes before you start, or nuke it for 15 seconds if you’re always running behind like me.
- 1 cup shredded cheddar cheese, divided: I use sharp cheddar because it holds its own against the buffalo heat. Half goes in the filling, half goes on top for that golden, bubbly finish. You can use Colby Jack if that’s what you’ve got — less sharp but still melty and delicious.
- ½ cup crumbled blue cheese (optional but highly recommended): This is the classic partner for buffalo chicken. My kids are not fans, so I serve it on the side for the grown-ups to sprinkle on top. If you’re feeding an anti-blue-cheese crowd, don’t stir it into the filling — just offer it at the table. I learned this the hard way when my daughter asked me to please “never put that moldy cheese in the food again.”
- 2 green onions, sliced: A pop of freshness and color at the end. Don’t skip these — they make the whole thing look and taste brighter.
- ¼ cup ranch or blue cheese dressing for serving: For dunking. Non-negotiable in my house.
What to Pull Out Before You Start
- A 9×13-inch baking dish — any shape is fine, you just need something that fits 8 pepper halves snugly
- A small mixing bowl for the filling (you can even mix right in the pan if you’re cutting dishes)
- A sharp knife and cutting board for prepping the peppers
- A fork or potato masher to break up the cream cheese into the chicken mixture — I use a fork and it works great
That’s genuinely it. No food processor, no fancy gadgets, no specialized anything.
Let’s Make It (Step by Step)
This moves fast once you start, so read through it once and then go. Most of these steps are just assembly — nothing here requires actual skill.
Preheat and Prep: Preheat your oven to 375°F. Slice each bell pepper in half through the stem (top to bottom), then scoop out the seeds and membranes with your fingers or a spoon. You want each half to look like a little boat — some seeds clinging on is totally fine, don’t obsess.
- Pre-roast the peppers: Line the pepper halves in your baking dish, cut side up. Roast for 10 minutes — just enough to start softening them and cook off some moisture. (📸 Photo tip: After pre-roasting, the pepper edges should look slightly shiny and just starting to wrinkle — that’s exactly what you want.)
- Mix the filling: While the peppers roast, combine the shredded chicken, ½ cup of buffalo sauce, softened cream cheese, and ½ cup of the shredded cheddar in a bowl. Mash it together with a fork until everything is evenly coated and creamy-looking. The cream cheese won’t be fully melted yet — that’s okay, the oven will take care of it.
- Let the flavors meld: Let the filling sit for at least 5 minutes while the peppers finish roasting. This is the step that keeps the sauce from sliding off the chicken and pooling at the bottom. I know it sounds too simple to matter, but trust me on this one.
- Stuff the peppers: Pull the peppers out of the oven and divide the filling evenly among the 8 halves. I use a spoon and just pile it generously — don’t be shy. Pack it in there slightly, but don’t smash it down flat. (📸 Photo tip: You want the filling mounded slightly above the pepper edge — that’s what makes the finished peppers look abundant and photogenic.)
- Top with cheese: Sprinkle the remaining ½ cup of cheddar over the top of each pepper. Generously. This is not the time to be stingy.
- Bake: Return the dish to the oven and bake for 20–25 minutes, until the filling is hot all the way through and the cheese on top is melted and starting to brown in spots. If you’re getting impatient and want the cheese darker, you can hit it with the broiler for the last 2 minutes — but watch it like a hawk, broilers are vicious.
- Rest and garnish: Take the dish out and let it rest for 5 minutes. This is important — it gives the filling time to set up a bit so it doesn’t fall apart when you lift a pepper out. Sprinkle the sliced green onions over the top and serve with a generous drizzle of ranch or blue cheese dressing, plus extra buffalo sauce on the side if you like things spicy.
How I Meal Prep These for the Week
These are honestly one of my favorite Sunday-prep recipes. I make a double batch and we’re set for lunches through Wednesday — they reheat beautifully, which is rare for anything stuffed.
- Fridge: Store leftovers in an airtight container for up to 4 days. Reheat in the oven at 350°F for 10–12 minutes to keep the peppers firm and the cheese melty. The microwave works in a pinch but the peppers get a little soft — still tasty, just less pretty, and I know you already know how I feel about that.
- Freezer: Yes, these freeze surprisingly well! Just don’t add the green onions before freezing. Freeze the baked peppers in a single layer on a baking sheet until solid, then transfer to a freezer bag for up to 3 months. Bake from frozen at 350°F for 25–30 minutes.
- Reheat: Oven is your best bet for keeping the peppers from turning mushy. If you’re stuck with a microwave, cover with a damp paper towel and do 60-second bursts — it’ll be fine, just softer.
Things I Wish I’d Known the First Time
- Don’t use the smallest peppers you can find: I grabbed a bag of adorable mini peppers once thinking they’d be so cute. They were the most frustrating thing I’ve ever tried to stuff — almost nothing fit inside and they collapsed in the oven. You need full-size bell peppers, I promise it’s worth it.
- Squeeze out the seeds gently: If you whack the pepper halves too hard to dislodge seeds, you’ll crack the pepper walls. Cracks mean the filling seeps out during baking and everything gets messy in the dish. Use your fingers to be gentle — the seeds mostly come out with one scoop anyway.
- Season the peppers with a pinch of salt and pepper before pre-roasting: I didn’t do this for the first ten times I made these, and the peppers themselves were always the blandest part. A tiny sprinkle transform- them — even if you eat low sodium normally, the peppers need this little push.
- Let the leftovers tell you something: If you’ve got extra filling, don’t stuff more peppers — just spoon it into a little greased ramekin, top with cheese, and bake it alongside the peppers. It’s like a bonus personal dip situation. Even if you mess this part up a little, it’ll still taste great — I’ve done it a hundred ways and it always works.
Swaps That Actually Work
- Dairy-Free: Use a dairy-free cream cheese alternative (the kind in the tub works better than the bricks for this) and your favorite vegan cheddar shreds. I’ve made it this way for my nephew who can’t do dairy and honestly, the filling is still creamy and rich — nobody at the table even knew!
- Extra Spicy (for the grown-ups): Add a tablespoon of chopped pickled jalapeños to the filling, or use a hotter buffalo sauce like the “Xtra Hot” Frank’s version. I do this for my husband and I after the kids go to bed — we call it “after hours” buffalo and it’s a whole vibe.
- No cream cheese: You can swap in Greek yogurt or sour cream if you’re out — the texture will be a little lighter and tangier, but it still works. I’ve done it with Greek yogurt and it’s actually really good — just keep it at room temperature for a few minutes so it doesn’t seize up when you mix it with the warm chicken.
- Poblano peppers instead of bell peppers: This makes a spicier, more Mexican-inspired version. Same cooking time, slightly more kick in every bite. I love doing this if I’m serving these with Spanish rice.
- Make it a dip: Skip the peppers entirely and put the filling in a small baking dish, top with cheese, and bake for 15–20 minutes. Serve with tortilla chips, celery sticks, and crackers. This is our New Year’s Day tradition now.
Questions I Get About This All the Time
Q: Why did my peppers come out watery instead of holding their shape?
A: Ugh, I’ve been there — it’s so frustrating! The culprit is almost always skipping the pre-roast step. That 10-minute head start is what lets some of the moisture escape before the filling goes in. Make sure you’re pre-roasting every single time, and also don’t cover the dish while it bakes — trapping steam in there will make everything mushy. You’ve got this next time, I promise!
Q: Can I make this with Greek yogurt instead of cream cheese for a healthier version?
A: Yes! I tested this and it works — just use plain Greek yogurt and expect a slightly lighter, tangier filling. Use the same amount (4 oz) and let it come to room temperature first so it mixes in smoothly. The texture won’t be quite as luscious as the cream cheese version, but honestly my kids didn’t even notice the difference. Fair warning: full-fat Greek yogurt works way better than nonfat, which can get a little watery.
Q: How long do these last and can I freeze the leftovers?
A: They’ll keep in the fridge for about 4 days in an airtight container. For freezing, I’d freeze only the baked peppers and skip the green onion garnish until after reheating — bake them from frozen at 350°F for 25–30 minutes. Reheat in the oven if you want the peppers to stay firm; the microwave will make them soft but it’s totally acceptable on a busy Tuesday. My rule is: oven for leftovers I’m eating at home, microwave for the lunch I forgot to pack until 10:30pm.
Q: What do you serve with these?
A: My family’s favorite combo right now is these peppers with a simple side salad — just some greens, cherry tomatoes, and a lemon vinaigrette to cut through the richness. On game days, I add celery sticks and carrot slices tossed in a little ranch seasoning, plus extra blue cheese dip. And these are also amazing with cilantro lime rice on the side if you want something more filling. Honestly, one of my kids’ favorite ways to eat them is absolutely unhinged: they stuff the leftover filling into tacos the next night. It’s become a whole thing.
More Recipes My Family Makes on Repeat
If you loved these stuffed peppers, here are a few others that get the same reaction at our table — and by that I mean everyone’s quiet while they eat, which never happens in this house:
- [INTERNAL LINK PLACEHOLDER: Creamy Tuscan Chicken Skillet with Spinach and Sun-Dried Tomatoes] — One pan, twenty minutes, and a garlic cream sauce that my oldest son calls “better than restaurant pasta.”
- [INTERNAL LINK PLACEHOLDER: Freezer-Friendly Breakfast Burritos That Don’t Turn Soggy] — The meal-prep breakfast that actually lasts all week — perfect for the chaos of school mornings.
- [INTERNAL LINK PLACEHOLDER: The Best Slow Cooker Pulled Chicken for Taco Tuesday] — So hands-off, you’ll feel like you cheated, and it uses the same shred-and-sauce principle that makes these peppers so good.
I hope you make these soon, whether it’s for a weeknight dinner after soccer practice, a game-day spread, or just a Tuesday when you need something warm and cheesy and a little bit spicy. If you try them, drop a comment below and tell me how they turned out — I genuinely love hearing about it, especially when your pickiest eater surprises you. And tag me on Pinterest so I can see your pretty peppers!
📌 Buffalo Chicken Stuffed Peppers recipe that stays crispy and never gets soggy — save this one for your weeknight dinner rotation when you need something cozy, spicy, and family-approved.
Buffalo Chicken Stuffed Peppers That Don’t Turn Soggy
Equipment
- 9×13-inch baking dish
- Small Mixing Bowl
- Sharp Knife and Cutting Board
- Fork
Ingredients
For the Peppers
- 4 large bell peppers, halved and seeded (orange or red preferred)
- 1 pinch salt and black pepper
For the Buffalo Chicken Filling
- 2 cups cooked shredded chicken (about 1 1/2 pounds)
- 3/4 cup buffalo sauce (such as Frank’s RedHot)
- 4 oz cream cheese, softened
- 1 cup shredded sharp cheddar cheese, divided
- 1/2 cup crumbled blue cheese (optional)
For Serving
- 2 green onions, sliced
- 1/4 cup ranch or blue cheese dressing, for drizzling
Instructions
- Preheat the oven to 375°F. Slice each bell pepper in half through the stem, top to bottom, then scoop out the seeds and membranes. Arrange the pepper halves cut side up in a 9×13-inch baking dish and season the insides with a pinch of salt and pepper.
- Pre-roast the peppers for 10 minutes, just until the edges look shiny and start to wrinkle.
- Meanwhile, in a small bowl, combine the shredded chicken, 3/4 cup buffalo sauce, softened cream cheese, and 1/2 cup of the shredded cheddar. Mash with a fork until everything is evenly coated and creamy-looking.
- Let the filling sit for at least 5 minutes while the peppers finish roasting.
- Remove the peppers from the oven and divide the filling evenly among the 8 halves, mounding it slightly above the edges.
- Sprinkle the remaining 1/2 cup cheddar over the top of each pepper.
- Bake for 20–25 minutes until the filling is hot and the cheese is melted and starting to brown. Let rest 5 minutes, then sprinkle with sliced green onions and serve with dressing and extra buffalo sauce on the side.
Notes
Related posts:
 The Slow Cooker Cowboy Casserole That Saves Tired Weeknights (No Soggy Tots Allowed)
 Quick Lemon Ricotta Pasta for Busy Weeknights: Creamy, Bright, and on the Table in 20 Minutes
 Lemon Garlic Butter Baked Salmon in Foil That’s Ready in 25 Minutes — No Fuss, No Mess
 Lipton Onion Soup Meatloaf for Tuesday Nights: Moist, Savory, and the Only One You’ll Ever Need
 Quinoa Chicken Sausage Bowls That Are Ready in 30 Minutes (And Actually Keep Well)
 Creamy Chicken Penne Pasta That’s Silky Smooth in 30 Minutes (No Heavy Cream Required)