

That first bite — when the fork cuts through the chicken and the cheese sauce clings to it in a slow, thick ribbon — is the exact reason this dish made it into our permanent rotation. My husband took one bite, looked at me across the table, and said “this is the one.” And it is. It’s the one I make on busy Tuesdays when I need something that feels like more than just chicken for dinner. It’s the one my 13-year-old nephew asks for by name when he comes over. And somehow — mercifully — it’s the one that takes 45 minutes from start to finish, with only about 20 of those minutes actually spent doing anything.
The short version: Juicy, seasoned chicken smothered in a homemade cheese sauce with green chiles and warm spices — ready in 45 minutes, and my kids have never once left leftovers.
I’ve made this version about thirty times now, tweaking the cheese blend and the spice balance until it hit that sweet spot. The version I’m sharing is the one that got a “can we have this every week?” from my family. Not bad for a Tuesday night experiment.
- Serves: 4 as a main
- Hands-On Time: 20 min | Total Time: 45 min
- Difficulty: Easy — the cheese sauce comes together in one pan, no special skills needed
- Cost per serving: ~$4.50
- Calories: ~510 per serving
- Dietary Notes: Can be made gluten-free with a simple swap — see Variations below
(Photo above: Overhead shot of the skillet with two golden-brown chicken breasts nestled in a creamy pale-gold cheese sauce with green chile flecks, finished with fresh cilantro and a sprinkle of cotija cheese, natural late-afternoon light from the kitchen window, on a worn wooden trivet with a stack of warm tortillas on the side.)
Why This Version Stays Creamy (When Others Get Grainy)
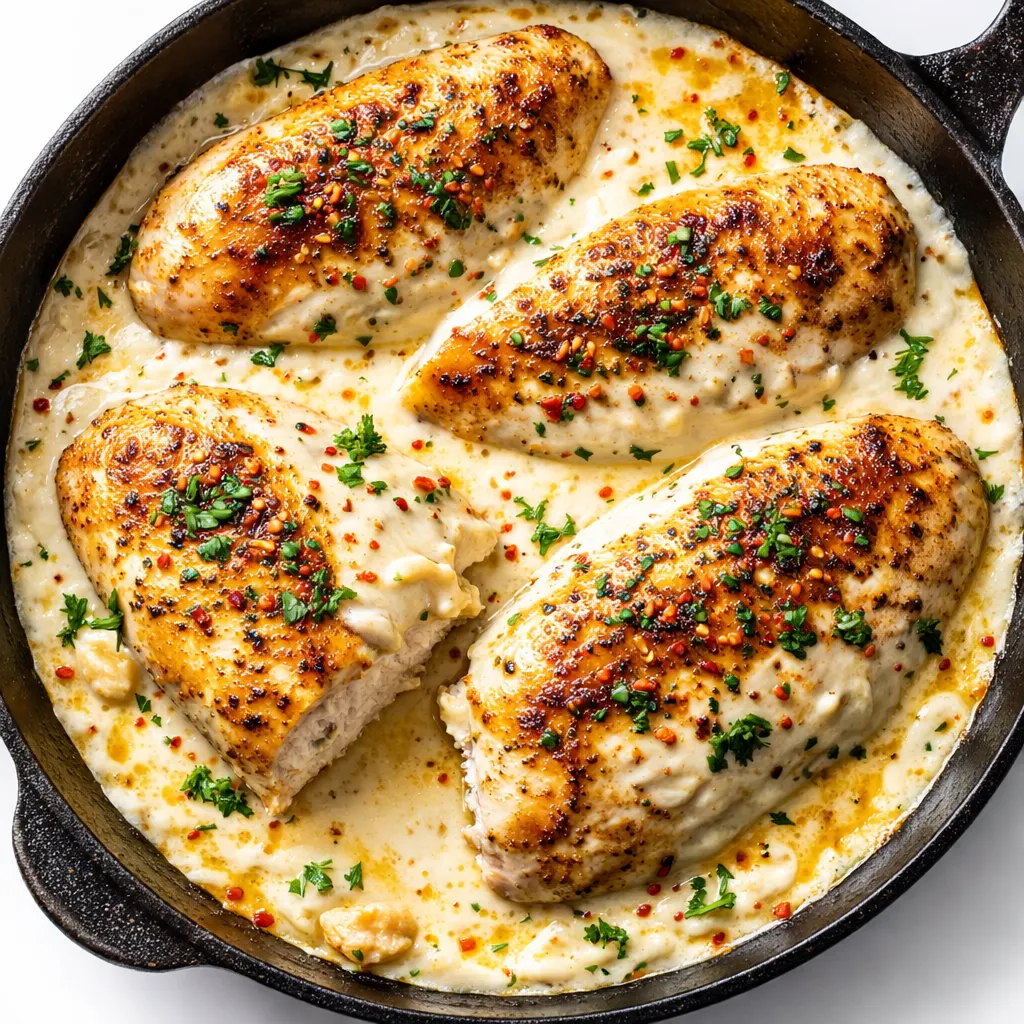
The secret to a cheese sauce that doesn’t separate or turn grainy is actually pretty simple: you build it on a roux and you don’t rush the heat. I start with butter and flour, cook it just until it smells nutty and toasty, then add the milk slowly while whisking. The flour thickens the milk so the cheese has something to cling to. If you just melt cheese into hot milk without that base, it can seize up and turn into a clumpy mess — I learned that the hard way more times than I’d like to admit.
The second thing that makes this version work is the cheese blend. I use Monterey Jack for its meltability and sharp cheddar for flavor. That combination gives you a sauce that’s creamy and smooth with real cheese taste, not just a one-note salty thing. Add the green chiles and cumin, and the whole thing comes together exactly the way you want it to.
What you end up with is a sauce that coats the chicken like a blanket — thick enough to hold its shape on the spoon but loose enough to pool around the rice or soak into a warm tortilla. That’s the texture you’re looking for.
Everything You Need (And a Few Notes From Me)
- 4 boneless skinless chicken breasts (about 1½ lbs total): I prefer breasts here because they stay juicy with the sauce. If you’re a thigh person, go for it — just add about 5 extra minutes to the bake time. My niece says thighs are “more flavorful” and honestly, she’s right. But breasts work better for my weeknight brain because they cook fast and evenly.
- 1 tbsp olive oil: For searing. Any neutral oil works — avocado, canola, whatever you’ve got.
- 1 tsp each cumin, chili powder, garlic powder, smoked paprika: This is the spice blend that gives the chicken its backbone. The smoked paprika is non-negotiable in my kitchen — it adds a low, warm smokiness that makes the dish taste like it simmered all day. My kids don’t love things too spicy, so I use mild chili powder here. If your family likes heat, swap in ancho or chipotle powder.
- Salt and black pepper: To taste. I do about ¾ tsp salt and ¼ tsp pepper across all four breasts.
- 3 tbsp unsalted butter: For the roux. If you only have salted, reduce the added salt in the sauce by a pinch.
- 3 tbsp all-purpose flour: This thickens the sauce. For a gluten-free version, use a 1:1 gluten-free all-purpose flour blend — I’ve tested it with Bob’s Red Mill and it works great.
- 1½ cups whole milk: Whole milk gives you the creamiest result. 2% works in a pinch, but the sauce will be slightly thinner. I don’t recommend skim — it can get watery.
- 4 oz Monterey Jack cheese, shredded (about 1 cup): This is your melt cheese. Shred it yourself from a block if you can — pre-shredded has anti-caking agents that can make the sauce a tiny bit grainy. I shredded mine from a block for years because Marta taught me that way, but on crazy nights I use pre-shredded and it’s still good. I won’t judge.
- 4 oz sharp cheddar, shredded (about 1 cup): This is your flavor cheese. White or yellow cheddar both work — yellow gives it a warmer color.
- 4 oz can diced green chiles (mild): These add a gentle heat and acidity that cuts through the richness. Don’t skip them — they’re what makes this taste like the Mexican restaurant version.
- ½ tsp cumin (for the sauce): A little extra cumin in the sauce reinforces what’s on the chicken.
- Fresh cilantro and cotija or queso fresco for garnish: Optional but lovely — the freshness on top makes the dish feel complete.
What to Pull Out Before You Start
- Large oven-safe skillet (12-inch cast iron or stainless steel work best — if your skillet isn’t oven-safe, transfer everything to a baking dish after step 4)
- Cutting board and sharp knife
- Small bowl for the spice mix
- Whisk
- Measuring spoons and cups
- Cheese grater (if you’re shredding from a block)
Let’s Make It (Step by Step)
This moves fast once you start, so I recommend reading through once and having everything measured before you turn on the stove. The sauce comes together in the same pan as the chicken, which means less cleanup and more flavor in every bite.
Preheat your oven to 375°F: With the rack in the middle. You’ll be baking the chicken after the sauce goes on.
- Season the chicken: Pat the chicken breasts dry with paper towels. In a small bowl, mix 1 tsp cumin, 1 tsp chili powder, 1 tsp garlic powder, 1 tsp smoked paprika, ¾ tsp salt, and ¼ tsp black pepper. Sprinkle the spice mix evenly over both sides of the chicken and rub it in gently. Getting the seasoning right on the meat is the foundation — don’t skimp here.
- Sear the chicken: Heat 1 tbsp olive oil in your skillet over medium-high heat until it shimmers. Add the chicken and cook 4–5 minutes per side, until golden-brown with a nice crust. The chicken won’t be cooked through yet — that’s fine. Transfer the chicken to a plate and set it aside. (📸 Photo tip: At this stage you should see deep golden-brown sear marks on both sides. Those marks = flavor. Don’t crowd the pan — if your skillet is small, do this in two batches.)
- Make the roux: Reduce the heat to medium. Add 3 tbsp butter to the same skillet and let it melt, scraping up any browned bits from the bottom. Sprinkle in the 3 tbsp flour and whisk continuously for about 1 minute — the mixture will bubble and turn a pale golden color and smell slightly nutty. This is where you want to stay with it. If you walk away, the flour can burn in about 30 seconds. I’ve done it. It’s sad.
- Build the sauce: Slowly pour in the 1½ cups milk while whisking constantly. Keep whisking until the sauce thickens enough to coat the back of a spoon — about 2–3 minutes. It should be smooth, with no lumps. (📸 Photo tip: When the sauce is ready, it should leave a clear path on the back of a wooden spoon when you run your finger across it — that’s the classic “coats the spoon” test.)
- Add the cheese and chiles: Remove the skillet from the heat. Stir in the shredded Monterey Jack, shredded sharp cheddar, the can of diced green chiles (undrained — the liquid adds flavor), and ½ tsp cumin. Stir until the cheese is fully melted and the sauce is smooth and creamy. Taste it and add a pinch more salt if needed.
- Return the chicken to the skillet: Nestle the seared chicken breasts back into the cheese sauce, spooning some of the sauce over the tops. If the sauce feels too thick, stir in a splash of milk before adding the chicken.
- Bake until bubbly: Transfer the skillet to your preheated oven and bake for 18–22 minutes, until the chicken is cooked through (internal temp of 165°F) and the sauce is bubbling at the edges. The cheese on top will be golden in spots — that’s the good stuff.
- Rest and serve: Let the skillet rest for 5 minutes on the stovetop — the sauce will thicken slightly as it settles. Garnish with fresh cilantro and crumbled cotija cheese if you’re using it. Serve over rice, with warm tortillas, or alongside a simple green salad.
How I Meal Prep These for the Week
This dish actually gets better after a day in the fridge — the flavors meld together and the chicken stays juicy from sitting in the sauce. I make a double batch on Sundays and we eat it on Monday and Wednesday. My secret: I cook the rice separately and store everything in the same container so the sauce soaks into the chicken overnight.
- Fridge: Store in an airtight container for up to 4 days. The sauce will thicken as it chills — that’s normal. Add a splash of milk or chicken broth when reheating.
- Freezer: Yes! The chicken and sauce freeze beautifully for up to 3 months. Cool completely before transferring to a freezer-safe container. Thaw overnight in the fridge before reheating.
- Reheat: The oven is best (350°F, covered, about 15 minutes) to keep the chicken tender. The microwave works in a pinch but the sauce can get a little thin — just stir it well and let it rest a minute before serving.
Things I Wish I’d Known the First Time
- Shred your own cheese if you can spare 3 minutes. Pre-shredded cheese has a coating that stops it from clumping in the bag, but it also makes your sauce slightly less smooth. I know it’s an extra step. I still do it on lazy nights. But when I want the silkiest version, I grab the block grater. It matters.
- Don’t rush the roux. That first minute of cooking the butter and flour together is what keeps your sauce from tasting like raw flour. Let it bubble and turn pale gold — the nutty smell is your signal. If you skip this step, the sauce will be thick but taste flat.
- Warm your milk before adding it. This is the tip that changed everything for me. Cold milk into a hot roux can make it seize up and turn lumpy. I microwave the milk for about 30 seconds before pouring it in. Even slightly warm milk incorporates much more smoothly.
- Let the chicken rest after baking. I know it’s hard when the whole kitchen smells like melted cheese and cumin. But those 5 minutes allow the juices to redistribute through the meat. If you cut into it immediately, the juices run out onto the plate instead of staying in the chicken. Trust me on this one.
Swaps That Actually Work
- Dairy-Free: Use a plant-based butter (I like Miyoko’s) and a good unsweetened oat or cashew milk. For the cheese, use a dairy-free cheddar-style shred — Daiya and Violife both melt decently. The texture won’t be exactly the same but it’s still really good. This is the version I make for my sister-in-law who’s dairy-free — she requests it every time she visits.
- Gluten-Free: Swap the all-purpose flour for a 1:1 gluten-free all-purpose blend. I’ve used Bob’s Red Mill and King Arthur Measure for Measure — both worked without any texture issues. The sauce thickens the same way.
- Spicy Version for the Grown-Ups: After the kids get their portion, I add a minced jalapeño or a teaspoon of chipotle in adobo to the remaining sauce. It adds a smoky heat that’s totally different from the mild version. My husband calls it “the adult table version.”
- Weeknight Shortcut: Use pre-cooked rotisserie chicken! Skip the searing step, make the sauce, then stir in 3 cups of shredded rotisserie chicken and bake for just 10 minutes to heat through. It’s dinner in 25 minutes flat.
Questions I Get About This Recipe All the Time
Q: Why did my cheese sauce turn out grainy?
A: Ugh, I’ve been there. Grainy cheese sauce usually happens for one of two reasons: the heat was too high when you added the cheese (it can seize), or you used pre-shredded cheese with a heavy anti-caking coating. Next time, try shredding it yourself and always remove the pan from the heat before stirring in the cheese. You’ve got this — it’s an easy fix.
Q: Can I make this with chicken thighs instead of breasts?
A: Yes, absolutely! Boneless skinless chicken thighs work great — they’re actually more forgiving because they don’t dry out as easily. Use about 1½ lbs, sear them the same way, and add about 5 extra minutes to the bake time. I’ve tested this and it comes out beautifully every time.
Q: How long does this last in the fridge? Can I freeze it?
A: It keeps in the fridge for up to 4 days in an airtight container. And yes, it freezes wonderfully — I freeze individual portions in small containers for lazy nights. Thaw overnight in the fridge and reheat in a 350°F oven, covered, for about 15 minutes. The sauce might look separated after freezing but a good stir brings it right back.
Q: What do you serve with this?
A: We love it over white rice with warm flour tortillas on the side — my kids call it “the taco bowl version of chicken.” A simple green salad with a lime vinaigrette cuts through the richness beautifully. And on lazy nights, I just serve it with tortilla chips for dipping. My secret weeknight trick: add black beans and corn to the rice and serve everything in one bowl.
More Recipes My Family Makes on Repeat
If you loved this one, here are a few others that get the same reaction at our table:
- [INTERNAL LINK PLACEHOLDER: One-Skillet Chicken Fajitas with Lime Crema] — The crema comes together in the time it takes the chicken to rest, and my kids actually fight over the pepper strips.
- [INTERNAL LINK PLACEHOLDER: Weeknight Black Bean Enchiladas] — No rolling required — just layer it like a lasagna and watch it disappear.
- [INTERNAL LINK PLACEHOLDER: The Only Guacamole Recipe You’ll Ever Need] — The trick is one extra ingredient that keeps it green for hours. Yes, hours.
This is the kind of dish that feels like a warm blanket on a busy weeknight — the cheese sauce is creamy, the chicken is juicy, and the whole thing comes together in one skillet so cleanup is almost as easy as eating it. You make it once and suddenly your family is asking for “that cheesy chicken thing” every single week.
If you try it, come back and let me know how it went — I love hearing which variations your family loved or what you served on the side. And if you’re on Pinterest, save this one for the next time you need a dinner that feels like more than just dinner.
📌 Mexican Chicken with Cheese Sauce recipe that stays creamy even as leftovers — save it for your busiest weeknight when you need something that feels like comfort food.

Mexican Chicken with Cheese Sauce
Equipment
- 12-inch oven-safe skillet (cast iron or stainless steel)
- Cutting board and sharp knife
- Whisk
- Measuring Spoons and Cups
- Cheese grater
Ingredients
Chicken and Seasoning
- 4 boneless skinless chicken breasts (about 1½ lbs)
- 1 tbsp olive oil
- 1 tsp cumin
- 1 tsp chili powder (mild)
- 1 tsp garlic powder
- 1 tsp smoked paprika
- ¾ tsp salt
- ¼ tsp black pepper
Cheese Sauce
- 3 tbsp unsalted butter
- 3 tbsp all-purpose flour
- 1½ cups whole milk
- 4 oz Monterey Jack cheese, shredded (about 1 cup)
- 4 oz sharp cheddar, shredded (about 1 cup)
- 1 can (4 oz) diced green chiles, mild
- ½ tsp cumin (for sauce)
- Fresh cilantro and cotija cheese for garnish (optional)
Instructions
- Preheat oven to 375°F with rack in middle.
- Season chicken: Pat chicken breasts dry. Mix cumin, chili powder, garlic powder, smoked paprika, salt, and pepper. Sprinkle evenly over both sides of chicken and rub in.
- Sear chicken: Heat olive oil in skillet over medium-high heat until shimmering. Cook chicken 4–5 minutes per side until golden-brown with a crust. Transfer to a plate (chicken won’t be cooked through).
- Make roux: Reduce heat to medium. Add butter to same skillet, scraping up browned bits. Once melted, sprinkle in flour and whisk continuously for about 1 minute until mixture bubbles, turns pale gold, and smells nutty.
- Build sauce: Slowly pour in milk while whisking constantly. Continue whisking until sauce thickens enough to coat the back of a spoon, about 2–3 minutes. Sauce should be smooth.
- Add cheese and chiles: Remove skillet from heat. Stir in shredded Monterey Jack and cheddar, diced green chiles (with liquid), and ½ tsp cumin. Stir until cheese is melted and sauce is smooth. Taste and add salt if needed.
- Return chicken: Nestle seared chicken breasts back into the sauce, spooning some sauce over the tops. If sauce is too thick, stir in a splash of milk.
- Bake: Transfer skillet to oven and bake 18–22 minutes until chicken is cooked through (internal temp 165°F) and sauce is bubbling at edges.
- Rest and serve: Let skillet rest 5 minutes on stovetop. Garnish with fresh cilantro and crumbled cotija if desired. Serve over rice, with warm tortillas, or alongside a green salad.
Notes
Related posts:
 The Slow Cooker Cowboy Casserole That Saves Tired Weeknights (No Soggy Tots Allowed)
 Quick Lemon Ricotta Pasta for Busy Weeknights: Creamy, Bright, and on the Table in 20 Minutes
 Lemon Garlic Butter Baked Salmon in Foil That’s Ready in 25 Minutes — No Fuss, No Mess
 Lipton Onion Soup Meatloaf for Tuesday Nights: Moist, Savory, and the Only One You’ll Ever Need
 Kielbasa Sausage Cheesy Potato Casserole That Tastes Like Sunday Dinner — In Under an Hour
 Quinoa Chicken Sausage Bowls That Are Ready in 30 Minutes (And Actually Keep Well)