

The first time I made this, my husband didn’t say a word for about six bites. Then he set his fork down, looked at me with that half-squint he gets when he’s trying to figure out if something is really as good as it seems, and said, “Okay. I get it now. I’d marry you all over again.”
That’s the thing about Marry Me Chicken — it delivers on the name, but not through flash. It’s a humble chicken breast in a creamy sun-dried tomato sauce with garlic, herbs, and a pile of Parmesan, and somehow all of it adds up to one of those dinners where the table goes quiet. Not the kind of quiet that means nobody likes it. The kind of quiet that means everybody’s too busy eating to talk.
The short version: Juicy chicken in a garlicky, tangy cream sauce that tastes like a restaurant splurge but comes together in 35 minutes flat.
I’ve made this at least thirty times since that first batch — with a pan that was too small, a whisk that was too flimsy, on a Tuesday when I didn’t think I had the energy left to stand at the stove. It has never once disappointed me. Even the imperfect versions are better than anything we’d order in.
- Serves: 4 as a main
- Hands-On Time: 20 min | Total Time: 35 min
- Difficulty: Easy — the sauce does all the impressing
- Cost per serving: About $4.50
- Calories: ~540 per serving
- Dietary Notes: Naturally gluten-free (with a simple swap), easily adaptable for dairy-free
(Photo above: overhead shot of the finished Marry Me Chicken in a well-seasoned cast iron skillet, the sauce creamy and pale gold with flecks of sun-dried tomato and herbs, a shower of fresh basil on top, steam curling up in the late-afternoon window light.)
What Makes This Different From Every Other Creamy Chicken
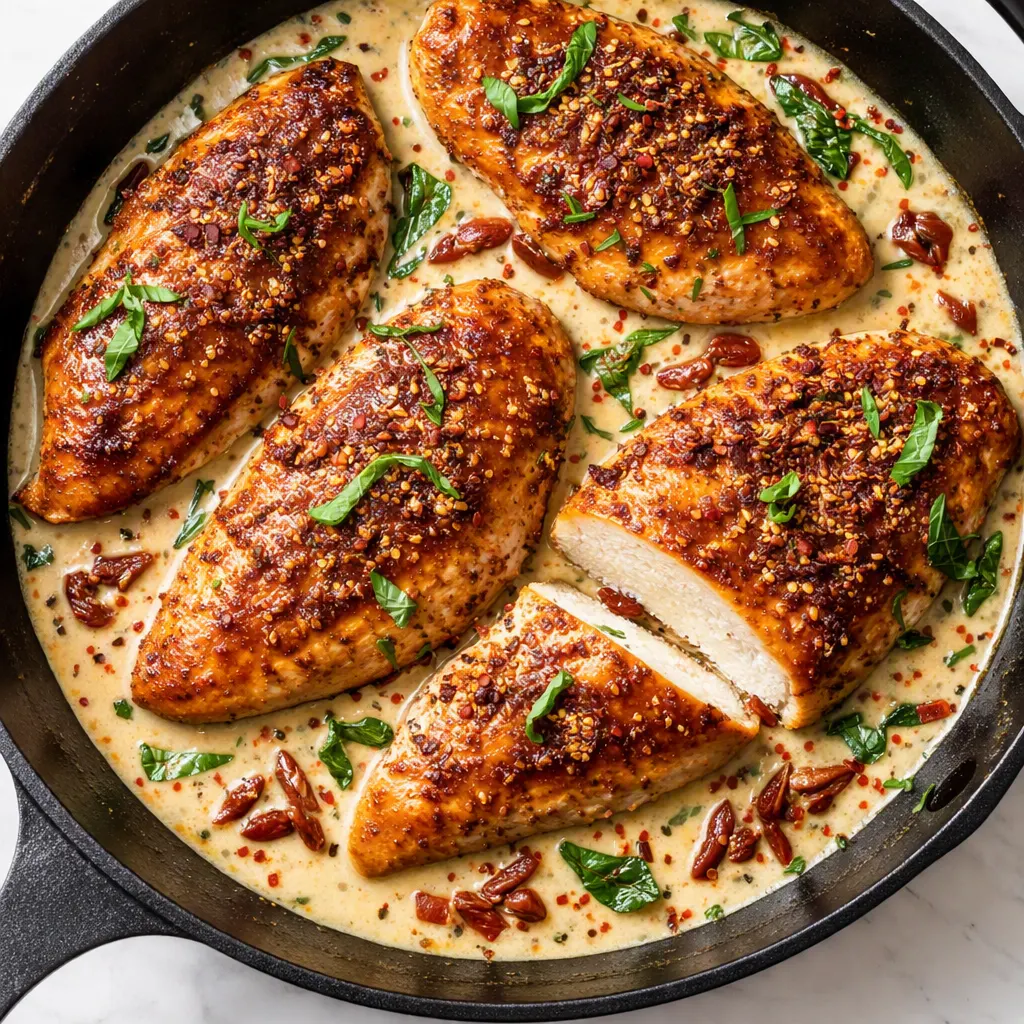
The secret isn’t the cream, and it isn’t the Parmesan — though both do their part. The real trick is the sear. You get that chicken breast nice and brown in a hot pan before the sauce ever goes in, and those deep caramelized bits stuck to the bottom of the skillet are where the entire flavor of this dish lives. When you pour in the broth and scrape them up, you’re building the sauce on a foundation that already tastes like dinner. Skip the sear and you’ve got a perfectly fine cream sauce over bland chicken. Do it right, and you’ve got something your family will request by name.
The second thing that makes this version work is the sun-dried tomatoes. They’re not just decoration — they bring a sweet-tart brightness that cuts right through the richness of the cream. Without them, the sauce is heavy. With them, you can’t stop eating it. The tang does what lemon does for a greasy fish: it keeps you going back for another bite.
Marta never made anything like this — sun-dried tomatoes weren’t her kind of thing. She would have raised an eyebrow at the name and then quietly gone back for second helpings. That’s always been my test.
What Goes In — Plus the Notes Nobody Else Gives You
- 2 large boneless, skinless chicken breasts (about 1½ pounds total): You’ll butterfly these into 4 thinner cutlets. If yours are enormous — the kind that look like they came from a dinosaur — this step is non-negotiable. It’s the difference between dinner in 35 minutes and dinner in an hour. My trick: lay your hand flat on top of the breast and slice horizontally with a sharp knife, keeping the blade level. You’re aiming for two even pieces about a half-inch thick, not a dramatic work of art.
- 1 teaspoon kosher salt + ½ teaspoon black pepper: Season both sides of the chicken before you dredge. Kosher salt matters here — the bigger flakes cling better and don’t over-salt the way fine table salt can.
- ¼ cup all-purpose flour: Just a light dusting for the chicken. It gives the crust something to grip and helps the sauce thicken in the last few minutes. If you’re gluten-free, swap in cornstarch or a 1:1 GF flour blend — I’ve tested both and they work fine.
- 1 tablespoon olive oil + 1 tablespoon butter: The combination gives you the flavor of butter with a higher smoke point so the butter doesn’t burn before the chicken browns. My kids can smell the difference when I skip the butter — I’m not joking, they come in from the other room.
- 3 cloves garlic, minced (about 1 tablespoon): Fresh garlic only. The jarred stuff turns bitter when it hits a hot pan. I know it’s tempting on a busy night. It’s not the same.
- ½ cup sun-dried tomatoes in oil, drained and sliced thin: Get the ones packed in oil, not the dry ones from the bulk bin. The oil-packed ones are softer, sweeter, and rehydrate in the sauce the way they’re supposed to. If you only have the dry ones, soak them in warm water for 10 minutes before you start.
- 1 cup chicken broth: Use a good one — you’ll taste the difference in the sauce. I use the low-sodium kind so I control the salt at the end.
- 1 cup heavy cream: Not half-and-half, not milk. Heavy cream is what makes this sauce glossy and stable. I learned this the hard way when I watched half-and-half curdle into something that looked like a bad divorce. Use the real stuff.
- ½ cup grated Parmesan: Grate it yourself. The pre-grated shreds are coated with cellulose so they don’t melt as willingly, and you’ll end up with a grainy sauce. A block of Parmesan in the fridge lasts forever — it’s worth the extra minute at the grater.
- 1 teaspoon dried oregano + ½ teaspoon dried thyme: Dried herbs work beautifully in this sauce because they have time to rehydrate and bloom. If you have fresh, use about triple the amount, chopped fine, and add them in the last 5 minutes so they don’t dull.
- ¼ teaspoon red pepper flakes (optional): This is the version my kids eat — just enough warmth to notice, not enough to complain. I double it when it’s just the adults, and no one has ever minded.
- Fresh basil or parsley for topping: The bright green on top isn’t just pretty — it gives your nose something fresh after all that richness. If you’ve got basil growing anywhere near your kitchen, this is the recipe to use it for.
The Only Equipment You’ll Need
- A 12-inch heavy-bottomed skillet — cast iron is my first choice, but a stainless steel or an enameled Dutch oven works beautifully too. Nonstick works, but you’ll get a less dramatic sear. My grandmother’s cast iron has been in my kitchen for thirty years and it’s the one thing I’d grab in a fire.
- Tongs — for flipping the chicken without piercing it and letting the juices out.
- A flat-edged wooden spoon or spatula — for scraping up the browned bits at the bottom of the pan. This is the most important tool on this list and nobody talks about it.
- A small bowl for the flour dredge, plus a plate for the raw chicken.
- Measuring cups and spoons. That’s it.
Let’s Make It — Step by Step, No Fancy Skills Required
This goes faster than you think it will, so read through the whole thing once before you start. You’ll thank me at minute twenty.
Prep: Butterfly the chicken breasts into 4 cutlets, pat them dry with paper towels, then season both sides with the salt and pepper.
- Dredge: Put the flour in a shallow bowl and coat each cutlet lightly, shaking off the excess. You want a thin, even dusting — not a thick crust. (📸 Photo tip: The cutlets should look like they’ve been lightly powdered with snow, with no bare spots and no clumps.)
- Sear: Heat the olive oil and butter in the skillet over medium-high heat until the butter stops foaming. Lay the chicken in the pan in a single layer — don’t crowd it, or you’ll steam instead of sear. Cook 4-5 minutes per side, until the underside is the deep amber color of good maple syrup and the edges lift away from the pan on their own. Transfer the chicken to a plate. This is the step everyone rushes, and it’s the one that matters most. If it doesn’t release when you nudge it, it’s not ready — give it another minute.
- Bloom the garlic: Turn the heat down to medium and add the minced garlic to the same pan. Stir constantly for about 30 seconds, until it smells sweet and sharp — the moment it perfumes the whole kitchen. The smell shift is your cue: raw garlic smells harsh, cooked garlic smells like dinner. The second you smell it turn sweet, you’re on track.
- Add the tomatoes: Stir in the sliced sun-dried tomatoes and let them warm through for a minute. They’ll sizzle softly as their oil meets the pan — that sound is the good kind. If it’s spitting aggressively, the pan is too hot; nudge the heat down.
- Deglaze: Pour in the chicken broth and immediately scrape the bottom of the pan with your wooden spoon, loosening all those browned bits. This is where the flavor lives — don’t leave a single one behind. Let the broth bubble for 1-2 minutes, until it reduces by about a third. Reading this step might look like extra work but it’s really just one minute with a spoon.
- Make it creamy: Pour in the heavy cream, then add the oregano, thyme, and red pepper flakes. Stir gently and bring it to a simmer — you’ll see small bubbles gathering at the edges of the pan, not a rolling boil. The cream is happiest at a bare whisper. (📸 Photo tip: The sauce at this point is the color of buttermilk biscuit dough, with red flecks of tomato scattered through it. That’s your “this is going to be good” moment.)
- Melt the Parmesan: Sprinkle in the grated cheese a handful at a time, stirring as you go. Let each addition melt before you add the next. The sauce will thicken as the cheese disappears into it. When it coats the back of a spoon and holds a clear line when you drag your finger through it, it’s ready. If it looks thin at this stage, don’t panic — it’ll keep reducing while the chicken finishes.
- Finish together: Nestle the seared chicken back into the skillet, spooning some sauce over the top of each piece. Let everything simmer gently, uncovered, for 5-7 minutes, until the chicken is cooked through and the sauce has thickened even more. On a tired Tuesday, this is the step where I sit down on a stool and just breathe for a minute. The stove is doing the work.
- Rest and serve: Turn off the heat and let the skillet sit for 5 minutes before you serve. I know it’s hard to wait when the whole kitchen smells like this, but the chicken is still finishing its job — the juices are settling back into the meat. Scatter fresh basil over the top and bring the whole skillet to the table. If you want to check doneness with certainty, an instant-read thermometer should read 165°F in the thickest part. Or press your fingertip into the center — it should feel springy, not squishy.
How I Make Ahead for Busy Weeks
This is one of those recipes that actually gets better after a night in the fridge — the flavors have time to stop competing and settle into each other. I make a double batch on Sunday and we eat it twice before Wednesday. My secret is to undercook the chicken by a minute or two when I know it’s going to be reheated, so the second time around it doesn’t dry out.
- Fridge: Store in an airtight container for up to 3 days. Reheat low and slow — a covered skillet over medium-low heat works best, adding a splash of broth or cream if the sauce has tightened up overnight.
- Freezer: Yes, it freezes well for up to 3 months. The cream sauce can separate slightly when thawed, but it comes right back together with a gentle reheat and a quick whisk. Freeze in individual portions for easy lunches.
- Reheat: Skip the microwave if you can — it tends to make the chicken rubbery and can split the sauce. A low saucepan or covered skillet is worth the extra five minutes.
The Mistakes I Made So You Don’t Have To
- Flipping the chicken too early: This is the most common home-cook mistake, and I did it for years. If the chicken sticks to the pan when you try to flip it, it’s telling you the crust isn’t ready. Wait until it releases on its own — that’s how you know it’s browned properly. I know it feels risky. It’s not. Give it another minute.
- Using half-and-half instead of cream: I already confessed this one up top, but it bears repeating. Half-and-half curdles when it meets the acidity of the sun-dried tomatoes and broth. Heavy cream is stable, glossy, and worth every one of the extra calories. Even if you mess this up a little, it’ll still taste good — but the texture won’t be the same.
- Not tasting before you serve: Recipes are guides, not contracts. Your Parmesan might be saltier than mine, your broth might be richer. Taste the sauce before the chicken goes back in, and add a pinch of salt if it needs it. That’s what the palates are for.
- Skipping the rest: I know it’s hard to wait. I know the house smells incredible. But cutting into the chicken immediately lets all the juices run out onto the cutting board instead of staying in the meat. Five minutes. That’s all. Set a timer and wash a dish while you wait — that’s what I do.
Swaps That Actually Work
- Dairy-Free: Use full-fat canned coconut milk instead of heavy cream and a good dairy-free Parmesan alternative. The sauce will be slightly coconut-sweet, so add an extra pinch of salt and a squeeze of lemon to balance it. This is the version I make when my sister-in-law comes to dinner — she’s told me twice it’s her favorite.
- Chicken Thighs: Boneless, skinless thighs are even more forgiving than breasts — they stay juicy with almost no effort. Sear 5-6 minutes per side and add about 5 extra minutes in the final simmer. When the grocery store is out of breasts, this is my automatic plan B.
- Spicy Adult Version: Double the red pepper flakes and add a drizzle of hot honey over the top right before serving. Sweet, spicy, salty, creamy — it’s the version I make after the kids are in bed, for no reason other than that I can.
- Lighter Version: Swap the heavy cream for half-and-half whisked with 1 teaspoon of cornstarch. It won’t be as unctuous, but it saves a lot of calories and still tastes good. Sometimes that’s exactly what a Tuesday night needs.
- Gluten-Free: Skip the flour dredge entirely, or use cornstarch or a 1:1 GF flour blend. The sear won’t be quite as deep, but the sauce holds up beautifully. My neighbor’s Celiac daughter has eaten this twice and given it two thumbs up.
- Overnight Company Version: Add ½ pound of sautéed cremini mushrooms with the garlic, and finish with a swirl of cold butter off the heat. It goes from “great weeknight dinner” to “please come over more often” in one easy addition.
The Questions I Get About This Chicken All the Time
Q: Why did my sauce turn out grainy and separated?
A: Ugh, I’ve been there. It’s almost always from one of two things: boiling the cream hard (it wants a bare whisper of a simmer, not a rolling boil), or pouring cold broth into a screaming-hot pan. Give the pan a minute to settle after the sear, pour the broth in off the heat, and keep the cream at a gentle bubble. And add your Parmesan gradually, not all at once. You’ve got this next time!
Q: Can I make this dairy-free?
A: Yes, and it’s better than you’d expect. Use full-fat canned coconut milk and a dairy-free Parmesan alternative, and add a squeeze of lemon at the end to brighten it back up. I’ve tested this and it works — the sauce won’t be quite as thick, but the flavor is still there.
Q: How long does Marry Me Chicken last in the fridge? Can I freeze it?
A: It keeps for up to 3 days in an airtight container in the fridge, and it freezes for up to 3 months. The sauce can separate a little after freezing, but a gentle reheat on the stove with a splash of cream or broth brings it back together. Reheat low and slow — the microwave will make the chicken rubbery and can split the sauce, so a skillet is the better choice.
Q: What do you serve with this?
A: Three things I rotate constantly: creamy mashed potatoes (the sauce absolutely dives into the craters — this is my favorite), a big pot of buttered egg noodles, and crusty bread for soaking up every last drop. When we want something green, I do a simple arugula salad with lemon and olive oil to cut the richness. My kids like it over pasta, which turns the whole thing into a kind of deconstructed carbonara situation — they don’t know that’s what it’s called, they just know they want seconds.
More Recipes My Family Makes on Repeat
If this one lands on your table as often as it lands on mine, here are a few others that get the same reaction around here:
- [INTERNAL LINK PLACEHOLDER: Creamy Tuscan Garlic Chicken] — The cousin of this dish, with spinach and a little white wine worked into the sauce.
- [INTERNAL LINK PLACEHOLDER: Brown Butter Mashed Potatoes] — My grandmother Marta’s recipe and the only mashed potato that’s ever made me forget there was chicken on the plate.
- [INTERNAL LINK PLACEHOLDER: Easy Skillet Sun-Dried Tomato Pasta] — The pantry-friendly pasta that uses up whatever sun-dried tomatoes you have left.
When you make this — and I hope you do — I hope you get one of those quiet-table moments. The kind where everybody’s too busy eating to talk, and the only sound is forks against the skillet and someone finally mumbling the words that started all of this: “Would you make this again?” Always. That’s the thing about Marry Me Chicken. It keeps its promises.
If you try it, drop a comment below and tell me how it went — I love hearing whether your table went quiet too. And tag me on Pinterest so I can see yours!
📌 Marry Me Chicken recipe that’s creamy, tangy, and ready in 35 minutes — save it for your next date-night dinner at home.

Marry Me Chicken That Earns Its Name — Creamy, Tangy, and on the Table in 35 Minutes
Equipment
- 12-Inch Heavy-Bottomed Skillet
- Tongs
- Wooden Spoon or Spatula
- Shallow Bowl
- Measuring Cups and Spoons
Ingredients
For the Chicken
- 2 large boneless, skinless chicken breasts (about 1 1/2 pounds total)
- 1 teaspoon kosher salt
- 1/2 teaspoon black pepper
- 1/4 cup all-purpose flour
- 1 tablespoon olive oil
- 1 tablespoon butter
For the Sauce
- 3 cloves garlic, minced (about 1 tablespoon)
- 1/2 cup sun-dried tomatoes in oil, drained and sliced thin
- 1 cup chicken broth (low-sodium if you have it)
- 1 cup heavy cream
- 1/2 cup grated Parmesan (grate it yourself)
- 1 teaspoon dried oregano
- 1/2 teaspoon dried thyme
- 1/4 teaspoon red pepper flakes (optional)
- Fresh basil or parsley, for topping
Instructions
- Prep: Butterfly the chicken breasts into 4 cutlets, pat them dry with paper towels, and season both sides with the salt and pepper. Set the flour in a shallow bowl.
- Dredge each cutlet lightly in the flour, shaking off the excess so only a thin, even dusting remains.
- Heat the olive oil and butter in a 12-inch heavy-bottomed skillet over medium-high heat until the butter stops foaming. Lay the chicken in a single layer and cook 4 to 5 minutes per side, until the underside is deep amber and releases from the pan. Transfer to a plate.
- Turn the heat down to medium and add the garlic. Stir for about 30 seconds, until it smells sweet and fragrant.
- Stir in the sun-dried tomatoes and let them warm through for about 1 minute.
- Pour in the chicken broth and scrape the browned bits from the bottom of the pan with a wooden spoon. Let the broth bubble for 1 to 2 minutes, until it reduces by about a third.
- Pour in the heavy cream and add the oregano, thyme, and red pepper flakes. Bring to a gentle simmer.
- Sprinkle in the Parmesan a handful at a time, stirring until each addition melts. Let the sauce cook until it coats the back of a spoon.
- Nestle the seared chicken back into the skillet, spoon sauce over the top, and simmer gently for 5 to 7 minutes, until the chicken is cooked through.
- Turn off the heat and let the skillet rest for 5 minutes. Top with fresh basil or parsley and serve.
Notes
Related posts:
 The Slow Cooker Cowboy Casserole That Saves Tired Weeknights (No Soggy Tots Allowed)
 Quick Lemon Ricotta Pasta for Busy Weeknights: Creamy, Bright, and on the Table in 20 Minutes
 Lemon Garlic Butter Baked Salmon in Foil That’s Ready in 25 Minutes — No Fuss, No Mess
 Lipton Onion Soup Meatloaf for Tuesday Nights: Moist, Savory, and the Only One You’ll Ever Need
 Kielbasa Sausage Cheesy Potato Casserole That Tastes Like Sunday Dinner — In Under an Hour
 Quinoa Chicken Sausage Bowls That Are Ready in 30 Minutes (And Actually Keep Well)