
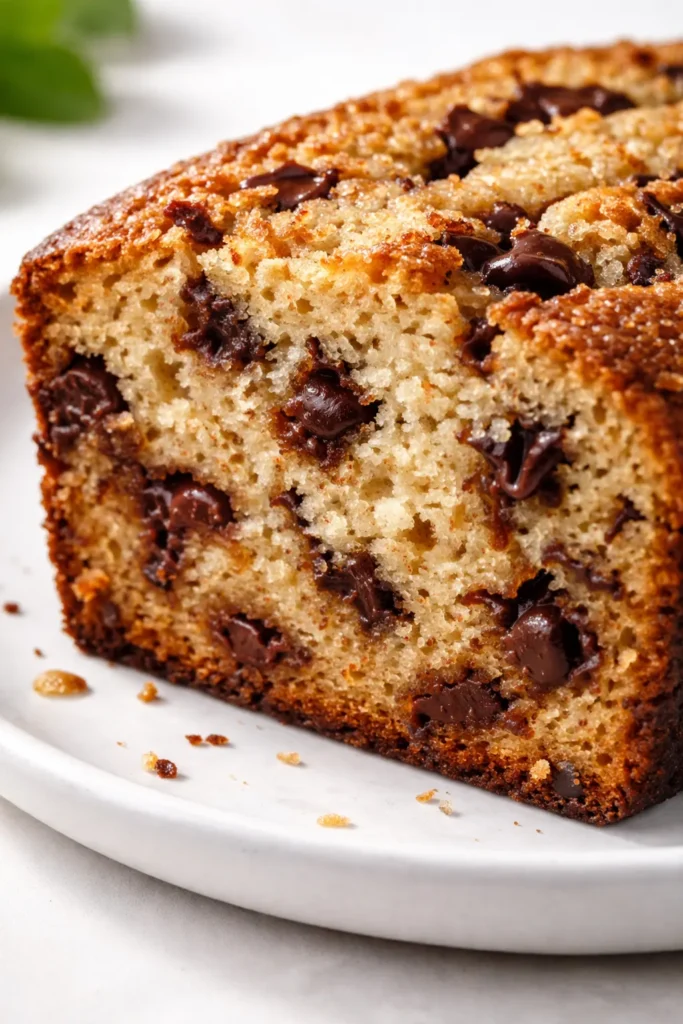
I know everyone claims their banana bread is the moistest. I’ve read those posts and tried those recipes, chasing the same thing you are — that slice where the crumb practically whispers against your teeth, dense enough to hold a fork upright, studded with melted chocolate in every bite. This is the one. I’ve made it 80 times to get the crumb exactly right — the exact balance of tender and sturdy, the crackly top that shatters when you slice it, the kind of moist that keeps it edible on day four without a single weird texture shift.
The short version: The moistest chocolate chip banana bread you’ll ever make — and it comes together in one bowl without a mixer.
My daughter Nora, who is 19 and studying art in Savannah, started requesting this in her care packages freshman year. Her roommate asked for a loaf for her birthday. That was the moment I knew I had to stop tweaking the recipe and just write it down for good.
- Serves: 8–10 as a snack or breakfast
- Hands-On Time: 15 min | Total Time: 1 hr 15 min
- Difficulty: Easy — the batter comes together in one bowl and doesn’t need a mixer
- Cost per serving: ~$0.85
- Calories: ~315 per slice
- Dietary Notes: Naturally nut-free. Adaptable for dairy-free.
(Photo above: A slice of banana bread resting on a blue-speckled enamel plate, cross-section showing a dense, tender crumb dotted with melted chocolate chips. Morning light coming from a window on the left, a mug of coffee blurred in the background.)
How I Keep It Moist Every Single Time
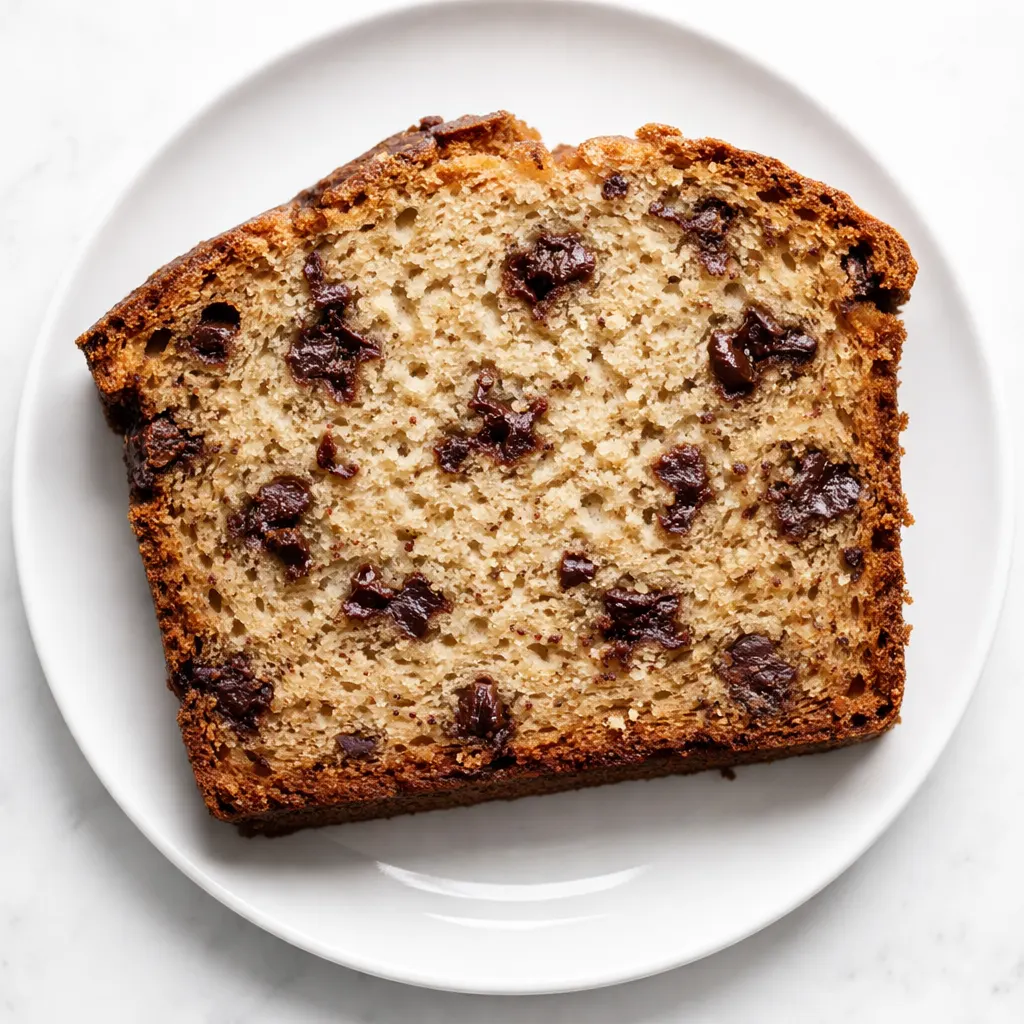
The secret isn’t one thing — it’s three things working together. First, the fat-to-flour ratio is higher than most recipes, which is the real difference between a loaf that feels dry by lunchtime and one that stays tender on day four. Second, I use melted butter instead of creamed butter. Melted butter coats the flour proteins differently — it shortens the gluten strands without having to cream air into the sugar. The result is a tighter, finer crumb that holds onto moisture instead of releasing it as steam in the oven.
The third thing is the bananas themselves. They have to be overripe. Not just “a few brown spots” overripe — the peel should be practically translucent, the bananas soft enough to mash with a fork in about ten seconds flat. If they don’t smell sweet and strongly of banana, they aren’t ready. That concentrated fruit is what keeps the bread moist without making it gummy.
I learned the melted butter trick after twenty loaves that were fine but not memorable. My grandmother Marta never used a mixer for her quick breads, and I understand why now. The gentler the hand, the more tender the result.
The Ingredient Breakdown (With Real Talk)
- 3 large very overripe bananas: This is non-negotiable. The spots should be brown, the peel practically falling off. If they don’t smell like bananas, they’re not ready.
My trick: if your bananas aren’t ripe enough, roast them at 300°F for 15 minutes — it concentrates the sugar and softens them perfectly. - 1/2 cup unsalted butter, melted: Melted, not creamed. This is the texture secret right here.
I’ve tested this with browned butter too, and it’s delicious — but for the classic moist crumb, just melted is perfect. - 3/4 cup granulated sugar: I tried brown sugar here and it was too heavy — it made the crumb dense in a way that felt leaden, not tender. Granulated keeps the bread light enough to lift without falling apart.
- 1 large egg + 1 egg yolk: The extra yolk is the richness boost you didn’t know you needed. It adds fat without adding structure, which keeps the crumb soft.
- 1 1/2 cups all-purpose flour: Spoon and level it. Scooping packs the flour and dries out the bread faster than anything else.
- 1 cup semi-sweet chocolate chips: I use semi-sweet because it balances the sweetness of the bananas without overwhelming them. Toss them in 1 tablespoon of flour before folding in — it keeps them from sinking to the bottom.
- 1 tsp baking soda: This is the only leavener you need. Make sure it’s fresh — test it by dropping a pinch into vinegar. If it fizzes vigorously, it’s good.
- 1/2 tsp salt: It’s not optional. Salt makes the banana flavor come forward instead of tasting flat.
- 1 tsp vanilla extract: A good vanilla rounds out the sweetness and makes the chocolate taste more chocolatey. Don’t skip it.
What You’ll Need
- 9×5 inch loaf pan — the standard size, not the smaller 8×4
- Parchment paper — for the sling that makes lifting the loaf out easy
- Two mixing bowls — one large, one medium
- A whisk and a rubber spatula
- Wire cooling rack
Let’s Make Banana Bread (Start to Finish)
This goes fast, so read through once before you start. The oven preheats while you mix, and everything comes together in about fifteen minutes of actual work.
Preheat and prep: Set your oven to 350°F with a rack in the center position. Grease a 9×5 loaf pan, then line it with two strips of parchment paper cut to fit the width and length, leaving overhang on two sides. This is the sling that makes removing the loaf effortless.
- Mash the bananas: Peel the bananas into the large bowl and mash them with a fork until smooth. A few small lumps are fine, but I prefer a uniform consistency — no one wants a hot pocket of unmixed banana in their slice.
(📸 Photo tip: At this stage, the mashed bananas should look like a thick puree — smooth enough to coat the back of a spoon but not watery.) - Whisk the wet ingredients: Add the melted butter, granulated sugar, egg, extra yolk, and vanilla to the mashed bananas. Whisk until smooth and fully combined. Don’t over-whisk — just until you can’t see any streaks of egg.
- Combine the dry ingredients: In the medium bowl, whisk the flour, baking soda, and salt together. This ensures the baking soda is evenly distributed so the bread rises evenly.
- Fold the dry into the wet: Pour the dry ingredients into the wet and fold gently with the rubber spatula. Stop when you can’t see flour anymore. A few streaks are okay — over-mixing develops gluten and makes the bread tough.
- Add the chocolate chips: In a small bowl, toss the chocolate chips with 1 tablespoon of flour. Fold them into the batter gently. The flour coating creates friction that holds the chips in place — they won’t sink to the bottom.
(📸 Photo tip: The final batter should be thick but scoopable — it should fall off the spatula in a ribbon, not drop in a single heavy mass.) - Bake: Scrape the batter into the prepared pan and spread it even. Bake for 55–65 minutes. At 55 minutes, start checking. A toothpick inserted in the center should come out with a few moist crumbs — not clean, and not wet batter. The top should be deeply golden and cracked.
- Cool properly: Let the loaf cool in the pan for 15 minutes. Then lift it out using the parchment sling and transfer it to a wire rack to cool completely. I know the smell is torture — the whole kitchen smells like bananas and browned butter and chocolate. But cutting it warm will collapse the structure and make it gummy. Give it the full cooling time.
How I Make This Ahead (And Freeze It)
I bake a double batch on Sundays. One loaf stays on the counter for the week, and the other goes straight to the freezer. It’s the kind of thing that makes weekday mornings feel less rushed — grab a slice, toast it, and you have something that tastes like you put in effort when you didn’t.
- Fridge: Wrap tightly in plastic wrap. It’ll stay moist for 4 days. I actually think day 2 is the best — the flavors settle and the crumb is perfectly tender throughout.
- Freezer: Yes, absolutely. Wrap the whole loaf (or individual slices) in plastic wrap, then a layer of foil. It freezes beautifully for up to 3 months.
- Reheat: Thaw at room temperature, then warm in a 300°F oven for 10 minutes. The microwave works in a pinch but it softens the edges — the oven keeps the crust crisp while the inside warms through.
Things I Learned After Way Too Many Loaves
- The ripeness rule: If your bananas aren’t spotty, don’t risk it. Roast them in the oven at 300°F for 15–20 minutes. The skins will turn black and the fruit will collapse into sweetness. It’s the best shortcut I know.
- The parchment sling is worth it: Cut two strips of parchment — one the width of the pan, one the length — and lay them in a crisscross. It’s the only way to lift a loaf out cleanly without scraping the sides or breaking the crust.
- The toothpick test nuance: A clean toothpick means it’s overbaked. A few moist crumbs means it’s perfect. Wet batter means it needs more time. This is the single most important visual cue in this recipe — pull it at the crumb stage.
- The overnight wrap: When the loaf is completely cool, wrap it tightly in plastic wrap and let it sit on the counter overnight. The moisture redistributes evenly through the loaf, and the texture is noticeably better by morning. If you can wait, this is the move.
Make It Yours (Easy Swaps That Work)
- Dairy-Free: Use melted coconut oil or your favorite vegan butter in place of the butter. Use dairy-free chocolate chips. I’ve tested this with coconut oil and it works beautifully — it adds a very faint coconut note that pairs well with the banana.
- Gluten-Free: Use a 1:1 gluten-free flour blend like King Arthur Measure for Measure. It works flawlessly here — just spoon and level it the same way you would regular flour.
- Add-Ins: Swap 1/2 cup of the chocolate chips for toasted walnuts or pecans. Toast them first — it makes a huge difference in flavor.
- Kid-Friendly: My kids love when I use milk chocolate chips instead of semi-sweet. It’s sweeter, sure, but they eat it faster and that’s a win in my book.
- Fancy Version: Swirl in 1/4 cup of creamy peanut butter or Nutella before baking. Drag a knife through the batter in a figure-eight pattern — it creates ribbons of flavor that make this feel like a bakery loaf.
The Banana Bread Questions I Get Every Week
Q: Why did my banana bread turn out dry?
A: A few things could be at play. Most likely, the bananas weren’t ripe enough — they need to be heavily spotted and soft. Another common culprit is scooping the flour instead of spooning and leveling it. Scooping packs in up to 25% more flour, which dries out the loaf. Finally, check your baking time — pull it at the first sign of doneness, when the toothpick comes out with moist crumbs. Even two extra minutes in the oven can push it from perfect to dry.
Q: Can I use frozen bananas?
A: Yes, and they’re actually perfect for this. Thaw them completely in a bowl, then pour off the excess liquid that separates. The pulp will be very soft and concentrated — exactly what you want for moist banana bread. I do this all winter long when I run out of fresh ripe bananas.
Q: How long does this stay fresh?
A: Kept tightly wrapped in plastic wrap on the counter, it’s good for 4 days. I actually prefer it on day 2 — the flavors have settled, the crumb is perfectly tender, and the chocolate chips have had time to soften into the bread slightly.
Q: What do I serve with this?
A: My favorite way is a thick slice, toasted lightly, with a generous smear of salted butter. For breakfast, I’ll serve it alongside a fried egg and some fresh fruit. For dessert? Warmed up for about 15 seconds in the microwave with a scoop of vanilla ice cream on top. My kids call this “banana bread à la mode” and it’s become a Friday night tradition.
More Recipes My Family Makes on Repeat
If you loved this banana bread, here are a few others that get the same reaction at our table:
- [INTERNAL LINK PLACEHOLDER: My Grandmother’s Sour Cream Coffee Cake] — “Tender, buttery, with a cinnamon-nut streusel that goes all the way through the middle.”
- [INTERNAL LINK PLACEHOLDER: The Only Blueberry Muffin Recipe You’ll Ever Need] — “Tall, domed, studded with berries, and ready in 30 minutes flat.”
- [INTERNAL LINK PLACEHOLDER: Overnight Oatmeal Casserole] — “Creamy, a little bit sweet, and the easiest breakfast for a busy week.”
This is the banana bread recipe that made my daughter’s college roommate request a loaf for her birthday. It’s simple, it’s forgiving, and it delivers exactly what it promises — moist, tender, chocolate-studded perfection every single time. When you make it, I hope it becomes that recipe for your kitchen too.
If you try it, let me know how it turns out in the comments below. I love hearing about your baking wins — and your questions, too.
📌 Pin this moist chocolate chip banana bread recipe for your next baking day — it’s the one that finally lives up to the promise of the perfect slice.
The Moistest Chocolate Chip Banana Bread
Equipment
- 9×5-inch loaf pan
- Parchment Paper
- Large Mixing Bowl
- Medium Mixing Bowl
- Whisk
- Rubber spatula
- Wire cooling rack
Ingredients
- 3 large very overripe bananas, peeled
- 1/2 cup unsalted butter, melted
- 3/4 cup granulated sugar
- 1 large egg
- 1 egg yolk
- 1 tsp vanilla extract
- 1 1/2 cups all-purpose flour, spooned and leveled
- 1 tsp baking soda
- 1/2 tsp salt
- 1 cup semi-sweet chocolate chips
- 1 tbsp all-purpose flour (for tossing chips)
Instructions
- Preheat oven to 350°F with a rack in the center. Grease a 9×5 loaf pan and line with a parchment paper sling (two strips crisscrossed, leaving overhang on two sides).
- In a large bowl, mash the bananas with a fork until smooth. Add the melted butter, sugar, egg, egg yolk, and vanilla. Whisk until well combined.
- In a medium bowl, whisk together the flour, baking soda, and salt. Pour the dry ingredients into the wet and fold gently with a rubber spatula until just combined. Do not overmix.
- In a small bowl, toss the chocolate chips with 1 tablespoon flour. Fold them into the batter gently.
- Scrape the batter into the prepared pan and spread evenly. Bake for 55–65 minutes, until a toothpick inserted in the center comes out with a few moist crumbs (not clean, not wet).
- Let the loaf cool in the pan for 15 minutes. Then lift it out using the parchment sling and transfer to a wire rack to cool completely before slicing.
- Wrap tightly in plastic wrap for storage. The loaf stays moist on the counter for up to 4 days. Freeze for up to 3 months.
Notes
To keep chips from sinking: Toss chocolate chips in a tablespoon of flour before folding into the batter.
For maximum moisture: Once cooled, wrap the loaf tightly in plastic wrap and let it sit overnight. The moisture redistributes evenly and the texture is noticeably better by morning.
Variations: Use dairy-free butter and chocolate chips for dairy-free. Substitute 1:1 gluten-free flour blend for gluten-free. Add 1/2 cup toasted walnuts or pecans for crunch. Swirl in peanut butter or Nutella before baking for a fancy version.
Related posts:
 Breakfast Potatoes That Actually Get Crispy (Not Soggy) — Finally
 The Iced Coffee Float That’s Better Than the Coffee Shop Version — Ready in 5 Minutes
 No-Blender Nutella Milkshake That’s Creamier Than Any Blender Version — in 5 Minutes
 Crispy Breakfast Burritos That Actually Stay Golden (Not Soggy) — Ready in 35 Minutes
 Egg Muffins That Don’t Turn Out Soggy or Spongey (High-Protein & Make-Ahead)
 Blueberry Banana Bread: The Trick That Keeps the Berries Suspended (Not Sunk to the Bottom)