

The first time I made egg muffins, they came out… fine. Edible. But not the kind of thing you’d text your sister a photo of. They were either rubbery from being cooked too long or watery from the vegetables sweating in the oven. Marta didn’t leave me a recipe card for this one — that was a learning curve I had to earn myself through trial and error. The trick — and I mean this sincerely — is watching for the exact moment the center loses its wet, glossy look. It’s like watching a pond still in the morning. There’s a split second where the surface tension changes and it just… settles. That’s when you pull them. My kids asked for these three weeks in a row, which for this house is practically a standing ovation. We call them “breakfast cookies” and I don’t correct them.
The short version: High-protein egg muffins that stay fluffy, not spongey — 20 minutes total, 12 muffins, perfect for your busiest mornings.
- Serves: 12 muffins (as a main or snack)
- Hands-On Time: 10 min | Total Time: 20 min
- Difficulty: Easy enough for a Tuesday
- Cost per serving: ~$1.25
- Calories: ~140 per muffin (depending on add-ins)
- Dietary Notes: Naturally gluten-free, low-carb. Easily made dairy-free.
(Photo above: A wire basket piled high with golden-brown egg muffins on a worn wooden farmhouse table. One muffin is broken open, showing a curd of melted cheddar and flecks of green onion. The light is the gray-gold of early morning coming through a side window.)
The Thing That Keeps These Fluffy (Not Rubbery)
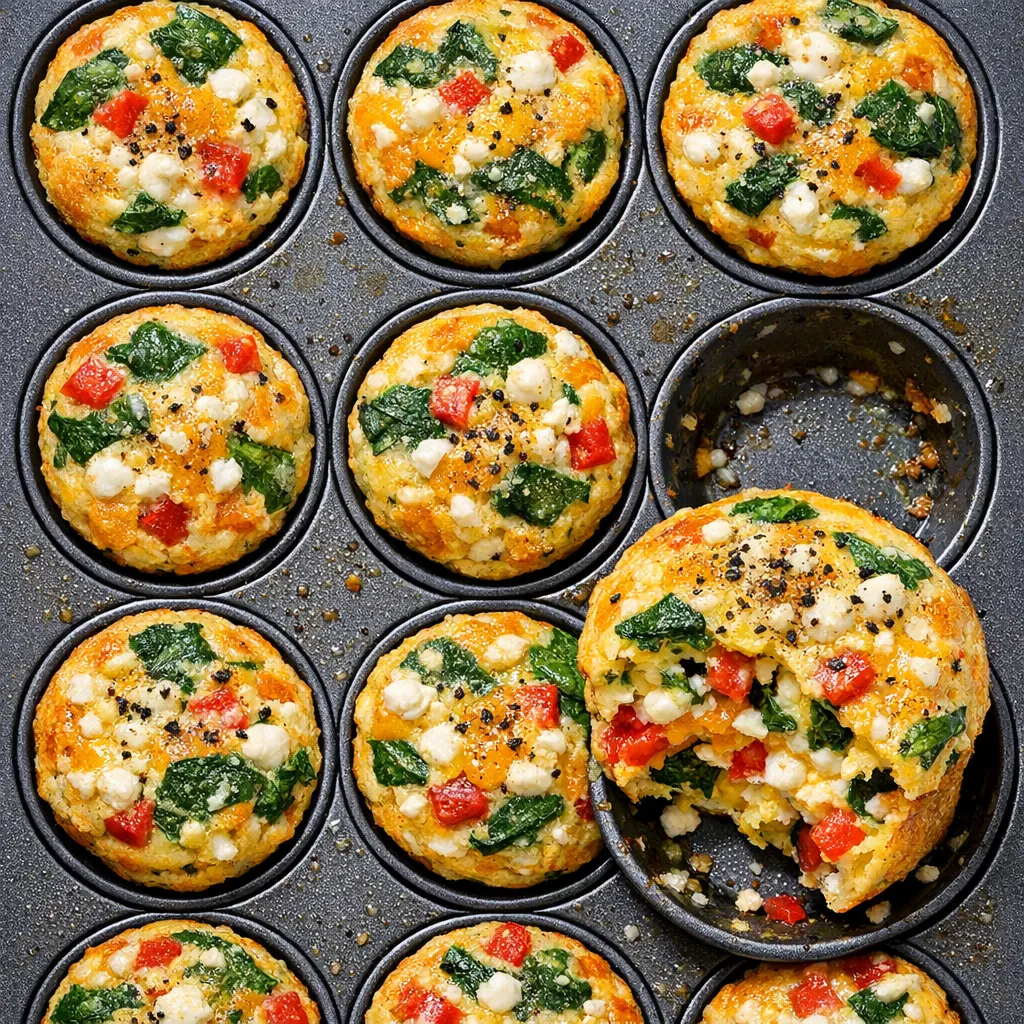
The cottage cheese is doing double duty here. It adds protein — obviously — but it also keeps the eggs from turning into the kind of dense, bouncy texture you get from a diner omelet that’s been sitting under a heat lamp. Blending it smooth is the key. If you skip the blender, you’ll get little curds. That’s not a tragedy, but the texture is much more cohesive when you take the extra thirty seconds.
And here’s where I learned the lesson the hard way: raw vegetables release water in the oven. That water steams the muffins from the inside, and that’s exactly what makes the center go soggy. So I take the extra minute to sweat my peppers and greens in a hot skillet first. I know it sounds like a fussy extra step, but try it once side-by-side with a batch that skips it. The texture is completely different. One of them squeaks when you bite into it. The other one doesn’t. You want the one that doesn’t.
Everything You Need (Plus a Note About the Cheese)
- 10 large eggs: The backbone. Farm-fresh if you can get them. The yolks are darker and the flavor is noticeably richer. My neighbor brings me hers, and the color alone is enough to convert you.
- ½ cup cottage cheese: Small-curd is fine. Full-fat or low-fat both work. I’ve tested it both ways. Full-fat is creamier, but low-fat still produces a tender muffin. My kids have never once noticed the swap.
- ½ tsp salt & ¼ tsp black pepper: Freshly cracked pepper makes a difference here. The pre-ground stuff is dusty by comparison.
- 1½ cups add-ins (chopped or shredded): This is where the recipe becomes yours. I do a classic combo: chopped spinach, red bell pepper, sharp cheddar, and crumbled breakfast sausage. But feta and sun-dried tomato is a close second in this house. Onions, broccoli, goat cheese — whatever is in your crisper drawer.
What You’ll Need (Probably Already Have It)
- A 12-cup non-stick muffin tin. If your pan has seen better days, give it a light spray of oil or butter before you add the mix-ins. A good non-stick surface is your best friend here.
- A blender or food processor. For smoothing the egg and cottage cheese base. A whisk will work in a pinch, but the blender gives you that uniform, custard-like texture.
- A wire cooling rack. This step matters more than you think. If you leave the muffins in the hot tin, they keep cooking and the bottoms steam. The rack stops the process at exactly the right moment.
Here’s How I Do It (Start to Finish)
The oven heats up fast, so get that preheating before you start chopping. This goes quickly once you get going.
- Preheat and Prep the Pan: Set the oven to 375°F. Finely chop your add-ins — think pea-sized, not chunked. Big pieces of pepper or broccoli make the muffins fall apart when you take them out of the tin. Divide your add-ins evenly among the 12 wells, about 2 tablespoons each. If your pan is older or the finish is a bit worn, grease the wells first with butter or oil.
- Blend the Base: Crack the eggs into a large blender. Add the cottage cheese, salt, and freshly cracked pepper. Purée for a full 30 seconds. It should look pale yellow and completely smooth, like a thin custard with no visible curds. (📸 Photo tip: I hold the blender up to the window light to check for any remaining white specks. That’s a Marta habit I can’t break.)
- Fill the Wells: Pour the egg mixture evenly over the add-ins in each well. They should be filled nearly to the top — that’s exactly what you want. They’ll puff up in the oven like little soufflés and then settle as they cool.
- Bake — and Watch, Don’t Walk Away: Bake for 18 minutes. Start checking at 15 if your oven runs hot. You’re looking for the centers to be just set — no longer wet and jiggly — and the edges to be a pale, gentle gold. Not brown. Gold. (📸 Photo tip: The tops will be puffed and domed. If they’re turning brown at the edges before the center is set, lower your oven temp by 25 degrees next time.)
- Rest and Release: Let them cool in the pan for exactly 2 minutes. Run a thin knife around the edge of each muffin. Tip the pan gently and they should release without a fight. Transfer them to a wire rack immediately. They’ll deflate as they cool — this is normal and exactly what should happen. Don’t panic.
How I Meal Prep These for the Week
I make a double batch on Sundays. My secret: I let them cool completely on the wire rack — no shortcuts here, the steam needs to escape — and then wrap each muffin individually in a paper towel before putting them all in a large zipper bag. The paper towel catches any condensation so they don’t get soggy. They’ve saved my bacon more Tuesday mornings than I can count.
- Fridge: In an airtight container, layered between paper towels, for up to 5 days.
- Freezer: Yes, absolutely. Wrap individually in plastic wrap, then place in a freezer bag. They’ll keep for 3 months.
- Reheat: Microwave for 30–45 seconds from the fridge, or 60–90 seconds from frozen. For a slightly firmer edge, reheat in a 350°F oven for 5 minutes. The microwave is faster, the oven is better. Depends on the morning.
My Honest Advice After Making These 40 Times
- Don’t over-bake thinking they need to be “done.” The single biggest mistake is waiting until the muffins look completely set on top. By then, the bottom is already a rubber hockey puck. Pull them when the *center* is just barely set and the edges are barely holding shape. Carry-over heat finishes the job.
- Sweat the vegetables. I know it’s an extra step. I know. But if you’re using frozen spinach or raw mushrooms, they release so much water that the muffin steams from the inside. I take the 90 seconds to sauté the moisture out, and the texture is completely different. I’ve done the side-by-side test. It’s not the same.
- Let the tin do the work. A good non-stick tin is worth its weight in gold here. If you’re using silicone, place the tin on a baking sheet first for stability. I’ve tipped a silicone pan carrying it to the oven once. The sound of eggs hitting the bottom of a hot oven is a specific kind of wake-up call.
- Freshly crack your pepper. I know this sounds like a snobby chef rule, but there’s a reason it matters. Pre-ground pepper is dusty and bitter. Fresh cracked pepper is floral and warm. In a simple recipe like this, where the ingredient list is short, those little choices are the difference between “fine” and “I need the recipe.”
Make It Yours: Easy Variations
- Dairy-Free: Use a dairy-free cottage cheese or 1/2 cup unsweetened almond milk blended with 1/4 cup nutritional yeast for the savory flavor. It works beautifully and my sister, who is dairy-free, requests these every time she visits.
- Kid-Friendly (The “Boring” One): Sharp cheddar and diced ham. That’s it. My kids eat these faster than I can pack them for their lunchboxes. They call them “breakfast cookies” and I’ve stopped correcting them.
- Grown-Up (The One I Hide in the Back): Goat cheese, caramelized onion, and a sprinkle of fresh thyme. These are the ones I save for myself. A little fancy, a little earthy, and they keep me company on a quiet Saturday morning.
- Higher Protein: Swap 2 of the eggs for 1/4 cup more cottage cheese and add an extra 1/4 cup of shredded chicken or turkey sausage crumbles. It makes the texture even more custard-like and keeps you full until lunch.
Questions I Get About These All the Time
Q: Why did my egg muffins turn out watery?
A: That’s the vegetables sweating. Next time, sauté them first in a hot skillet to cook off the moisture. Frozen spinach is the biggest culprit — wring it dry in a clean kitchen towel until not a single drop comes out before adding it to the tin.
Q: Can I make these without a blender?
A: You can! I’ve done it with a whisk and a strong arm. The texture won’t be quite as smooth and uniform — you’ll have tiny curds of cottage cheese throughout — but it’ll still taste wonderful. The blender is just my lazy shortcut to a velvety texture.
Q: How long do these last in the fridge? Can I freeze them?
A: 5 days in the fridge in an airtight container, layered with paper towels. Yes, they freeze beautifully for up to 3 months. I wrap them individually in plastic wrap, then toss them in a freezer bag. Just grab one and reheat. No thawing required.
Q: What do you serve with these for a full breakfast?
A: We do a simple fruit salad on the side and call it a win. But if I’m feeling ambitious, I’ll do a batch of these with some roasted potato wedges and a few slices of avocado. It’s my perfect quiet morning breakfast — the one where I sit down with coffee and actually read the newspaper.
More Recipes My Family Makes on Repeat
If you liked this one, here are a few others that get the same reaction at our table:
- [INTERNAL LINK PLACEHOLDER: Farmhouse Frittata] — The one I make when I have a fridge full of odds and ends and a hungry crowd.
- [INTERNAL LINK PLACEHOLDER: Freezer Breakfast Sandwiches] — Because some mornings need a biscuit, and because I believe in having options.
- [INTERNAL LINK PLACEHOLDER: Overnight Steel-Cut Oats] — The set-it-and-forget-it solution for the rest of the week. My husband makes this one now, which is the highest compliment.
This recipe came from a place of necessity — needing something I could eat with one hand while packing lunch boxes with the other. I hope it saves your mornings the way it saves mine.
If you try them, drop a comment below. I always love hearing how they turn out in other kitchens — the victories and the lessons alike.
📌 Pin this high-protein egg muffin recipe for your next meal prep Sunday — your future self on Wednesday morning will thank you.

Egg Muffins That Don’t Turn Out Soggy or Spongey (High-Protein & Make-Ahead)
Equipment
- 12-cup non-stick muffin tin
- Blender or food processor
- Wire cooling rack
Ingredients
- 10 large eggs
- 1/2 cup cottage cheese (small-curd)
- 1/2 teaspoon salt
- 1/4 teaspoon black pepper (freshly cracked)
- 1 1/2 cups add-ins: chopped vegetables, shredded cheese, and/or cooked meat (e.g., spinach, bell pepper, cheddar, sausage)
Instructions
- Preheat the oven to 375°F. Finely chop your add-ins into pea-sized pieces. Divide them evenly among the 12 wells of a greased (if needed) non-stick muffin tin, about 2 tablespoons each.
- In a blender, combine the eggs, cottage cheese, salt, and pepper. Purée for 30 seconds until pale yellow and completely smooth, with no visible curds.
- Pour the egg mixture evenly over the add-ins in each well, filling nearly to the top.
- Bake for 18 minutes, or until the centers are just set (no longer wet or jiggly) and the edges are pale gold. Start checking at 15 minutes if your oven runs hot.
- Let cool in the pan for exactly 2 minutes. Run a thin knife around each muffin, then tip the pan to release. Transfer to a wire rack immediately. They will deflate as they cool – this is normal.
Notes
Related posts:
 Breakfast Potatoes That Actually Get Crispy (Not Soggy) — Finally
 The Iced Coffee Float That’s Better Than the Coffee Shop Version — Ready in 5 Minutes
 No-Blender Nutella Milkshake That’s Creamier Than Any Blender Version — in 5 Minutes
 Crispy Breakfast Burritos That Actually Stay Golden (Not Soggy) — Ready in 35 Minutes