
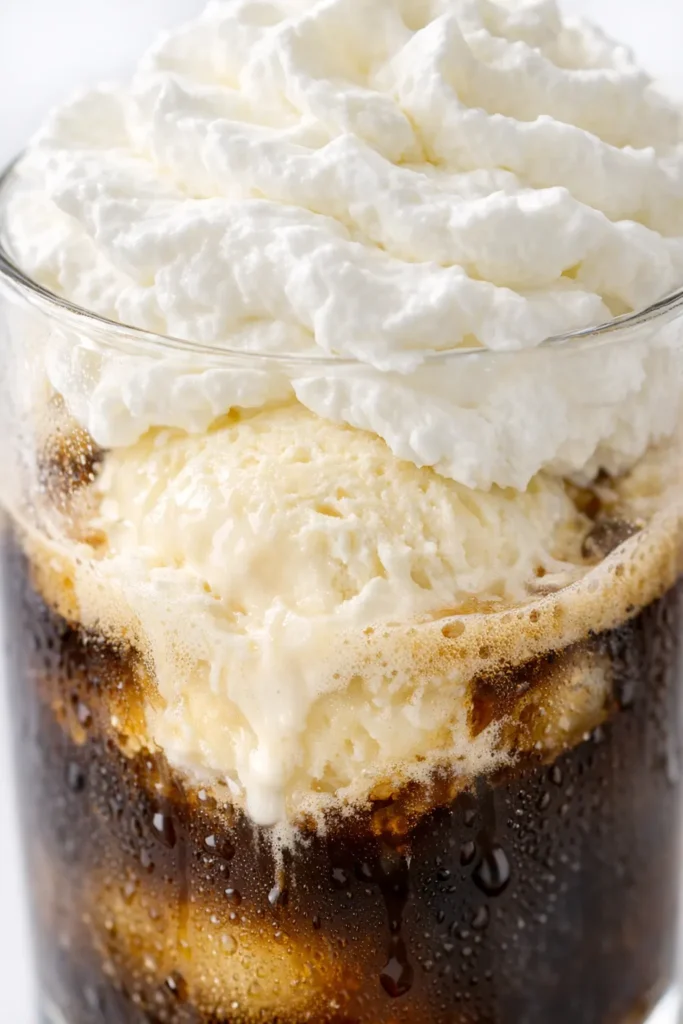
There’s a specific sound this drink makes. It’s the gentle crack of the ice settling under the pour, the way the chilled coffee hits the cold vanilla ice cream and creates that first little bloom of cream at the top. By the time you’re spooning on the fresh whipped cream, the kitchen smells like a Sunday morning café — bitter coffee, sweet vanilla, and the faint clean scent of cold cream from the bowl. This is the drink my daughter Nora asked for the day she came home from college. “Make that thing with the clouds on top,” she said. So I did.
The short version: Two scoops of vanilla ice cream, a cup of strong chilled coffee, and a cloud of fresh whipped cream that makes the whole thing taste like a coffee shop splurge — in five minutes, no fancy equipment required.
I have made this exact version for the last three summers, and every time the first sip tastes like a small luxury. Nora takes hers with chocolate wafers. I dust mine with a little cocoa. It is the easiest thing I make all week and somehow the one that feels the most like a treat.
- Serves: 2 as a dessert or afternoon pick-me-up
- Hands-On Time: 5 min | Total Time: 5 min
- Difficulty: So easy it barely counts as a recipe
- Cost per serving: ~$2.00
- Calories: ~380 per serving
- Dietary Notes: Vegetarian. Adaptable for dairy-free (see swaps below).
(Photo above: Overhead shot of two tall glasses of iced coffee, a generous scoop of vanilla ice cream melting at the bottom, and a thick swirl of fresh whipped cream on top, dusted with cocoa powder. A few chocolate wafers rest on a linen napkin beside the glasses. Morning light from a side window.)
The One Step Everyone Skips — And Why It’s Worth It

The canned whipped cream is fine in a pinch. I won’t pretend I have never used it when I was in a hurry. But the fresh whipped cream changes the entire geometry of this drink. Canned cream is mostly air and it dissolves into the coffee almost immediately. Fresh whipped cream sits on top like a thick blanket. You get a spoonful of it with every sip. It stays creamy and cold while the coffee below stays dark and strong.
The ice cream does a different job. It slowly melts into the coffee, giving it a body that milk alone cannot touch. It sweetens the coffee from the bottom up. By the time you reach the end of the glass, the last few sips are rich and almost pudding-like.
Together, the ice cream and the fresh cream make a drink that feels deeply decadent without being complicated. That is the whole secret.
What Goes In — Plus My Honest Notes
- 1 cup heavy or whipping cream: This is the cloud. Do not use half-and-half here — it will not whip. The heavy cream is what makes it spoonable and thick. I keep a carton in the fridge just for this.
- 1 tablespoon powdered sugar: Just enough to take the edge off the cream. The powdered sugar dissolves instantly, so you do not get that gritty texture granulated sugar can leave behind. I have tested both.
- 1 pint vanilla ice cream: The better the ice cream, the better the drink. I use a local brand with real vanilla bean specks. My kids love it with chocolate ice cream too, and I have made it with a good quality oaty coconut ice cream for my dairy-free friends — it works beautifully.
- 2 cups chilled strong coffee: This is the part that matters most. It must be strong and it must be cold. If it is warm, it melts the ice cream too fast and you end up with a puddle. I brew mine double-strength the night before and stick it in the fridge. A medium roast with chocolate notes is my favorite — it complements the vanilla instead of fighting it.
- To serve: cocoa powder, chocolate syrup, wafers — These are optional but they make it feel like a real event. Nora loves the chocolate wafers. I dust mine with a little cocoa. It is not necessary. It is just nice.
What to Pull Out Before You Start
- A medium mixing bowl — metal if you have one, it keeps the cream colder
- A whisk or an electric mixer (I use my hand mixer because it is faster, but a whisk works beautifully if you want the arm workout)
- Two tall glasses — a 12-ounce glass is the perfect size
That is genuinely everything you need.
Let’s Make It — No Fancy Skills Required
This goes fast. By the time you finish whisking the cream, you are practically done. Read through once before you start so you know what is coming.
- Make the whipped cream: Combine the cream and powdered sugar in a medium mixing bowl. Whip on medium speed (or by hand) until firm peaks form. You are looking for a texture that holds its shape but is still soft and pillowy — not stiff, not runny. The moment you lift the whisk and the cream stands up in a peak without drooping, stop. (📸 Photo tip: The cream should stand up in a peak when you lift the whisk — not droop, not turn into butter. If it looks grainy, you have gone too far.)
- Set the base: Place 2 generous scoops of vanilla ice cream into a tall glass. I use a warm scoop so it glides through the ice cream without cracking it. This is the base. It will soften slightly when the coffee hits it, which is exactly what you want.
- Pour the coffee: Pour 1 cup of chilled strong coffee over the ice cream. Pour it slowly so it does not overflow. Watch how it pools around the ice cream — that is the color you are looking for. Dark and rich at the bottom, creamy and pale where it meets the ice cream. (📸 Photo tip: Right after you pour, you will see the ice cream start to melt into the coffee, creating that beautiful creamy swirl at the edges.)
- Top with whipped cream: Spoon a big, generous dollop of whipped cream on top. Do not be shy with it. This is the moment it goes from everyday iced coffee to something special. I use a large spoon and just pile it on.
- Garnish and serve: Sprinkle a little cocoa powder or drizzle chocolate syrup over the whipped cream. Add a wafer or two if you have them. Serve immediately, with a straw and a long spoon.
How I Prep These for the Week
This is one of those drinks that is best made fresh, but you can absolutely set yourself up for an easy week. I make a big batch of double-strength coffee on Sunday night and stick it in the fridge. That way, the whole thing comes together in the time it takes to scoop the ice cream.
- Fridge: The brewed coffee keeps in the fridge for up to a week in a sealed jar. I use a mason jar. It is ready to go whenever the craving hits.
- Freezer: You can scoop the ice cream into the glasses and freeze them for 10–15 minutes before assembling. This keeps the drink colder and stops the ice cream from melting too fast when the coffee hits it.
- Reheat: This one is strictly cold. No reheating needed.
Things I Wish I Had Known the First Time
- Use a tall glass. A short glass will not hold everything — the coffee, the ice cream, and the whipped cream need room. A 12-ounce glass is the sweet spot. I learned this after overflowing a short tumbler and losing half the whipped cream to the counter.
- Do not skip the chill. If your coffee is not cold, it will melt the ice cream into a puddle before you even get the whipped cream on. Brew it ahead and refrigerate it. It makes all the difference.
- Taste the coffee first. If it is bitter, it will ruin the drink. I use a medium roast with chocolate notes — it complements the vanilla ice cream beautifully. A bright, acidic coffee can clash with the cream.
- Make it for dessert. This is sweet enough to be a dessert. Nora and I make it after dinner when we want something that feels like a treat but is not a whole cake. It hits the same spot as a milkshake but with half the effort.
Make It Yours — Easy Swaps
- Dairy-Free: Use a good quality oat or coconut milk vanilla ice cream and a can of full-fat coconut cream (chilled and whipped) instead of the heavy cream. It works beautifully. I have tested it for a friend who cannot do dairy and she said it was the best iced coffee she had had in years.
- Spicy: Add a pinch of cinnamon or nutmeg to the whipped cream before you whip it. I do this in the fall and it feels like a cozy sweater in a glass.
- Kid-Friendly: Use chocolate milk or a little chocolate syrup in the coffee for the kids. Nora loved this growing up — it was her “special coffee” on weekend mornings.
- For the Adults: Add a splash of Kahlúa or bourbon to the coffee before pouring it over the ice cream. It is dangerous how good it is. I save this version for after the kids go to bed.
Questions I Get About This All the Time
Q: Why did my whipped cream turn out runny?
A: Ugh, I have been there. It usually means the cream was not cold enough or it got over-whipped. Stick the bowl and the cream in the fridge for 10 minutes before you start. And stop whipping the moment it holds a peak — if you keep going, it will separate and turn into butter. You have got this next time.
Q: Can I make this dairy-free?
A: Yes! I listed it above, but my favorite version uses oat milk ice cream and a can of full-fat coconut cream for the whip. Chill the coconut cream overnight and whip it the same way you would heavy cream. It is just as creamy and rich.
Q: How long does the whipped cream last?
A: It keeps in the fridge for about 2–3 hours. After that, it starts to deflate and turn watery. For best results, make it right before you serve it. The coffee and the ice cream will not wait for it anyway.
Q: What do you serve with this?
A: Honestly, it is perfect on its own. But for a real dessert spread, I serve it with a little biscotti or a sprinkle of chocolate shavings. It is also great alongside a slice of pound cake or a thick piece of banana bread.
More Recipes My Family Makes on Repeat
If you liked this one, here are a few others that get the same reaction at our table:
- [INTERNAL LINK PLACEHOLDER: Marta’s Simple Chocolate Pudding] — The one Nora asks for on her birthday. Silky and smooth and made in one pot.
- [INTERNAL LINK PLACEHOLDER: Cold Brew with Sweet Cream] — My go-to summer coffee. It is dangerously easy to drink and feeds a crowd.
- [INTERNAL LINK PLACEHOLDER: The Best Vanilla Ice Cream (No Machine Needed)] — Homemade and so creamy. Perfect with a scoop on top of this iced coffee.
I love making these on a lazy Sunday morning or for a late afternoon pick-me-up. There is something about the combination of the cold coffee and the sweet cream that feels like a small luxury you do not need to leave the house for.
If you make it, tag me on Pinterest or drop a comment below — it makes my day to see yours in my kitchen.
📌 This 5-minute ice cream coffee recipe with fresh whipped cream is my family’s favorite summer treat — save it for your next lazy Sunday morning.

The Iced Coffee Float That’s Better Than the Coffee Shop Version — Ready in 5 Minutes
Equipment
- Medium Mixing Bowl
- Whisk or Electric Mixer
- Tall Glasses (12 oz)
Ingredients
- 1 cup heavy or whipping cream
- 1 tablespoon powdered sugar
- 1 pint vanilla ice cream
- 2 cups chilled strong coffee
Instructions
- Make the whipped cream: Combine the cream and powdered sugar in a medium mixing bowl. Whip on medium speed (or by hand) until firm peaks form. You are looking for a texture that holds its shape but is still soft and pillowy — not stiff, not runny. The moment you lift the whisk and the cream stands up in a peak without drooping, stop.
- Set the base: Place 2 generous scoops of vanilla ice cream into a tall glass. Use a warm scoop so it glides through the ice cream without cracking it. This will soften slightly when the coffee hits it, which is exactly what you want.
- Pour the coffee: Pour 1 cup of chilled strong coffee over the ice cream. Pour it slowly so it does not overflow. The coffee should pool around the ice cream — rich at the bottom, creamy where it meets the ice cream.
- Top with whipped cream: Spoon a big, generous dollop of whipped cream on top. Do not be shy with it. This is the moment it goes from everyday iced coffee to something special.
- Garnish and serve: Sprinkle a little cocoa powder or drizzle chocolate syrup over the whipped cream. Add a wafer or two if you have them. Serve immediately with a straw and a long spoon.
Notes
Related posts:
 Breakfast Potatoes That Actually Get Crispy (Not Soggy) — Finally
 No-Blender Nutella Milkshake That’s Creamier Than Any Blender Version — in 5 Minutes
 Crispy Breakfast Burritos That Actually Stay Golden (Not Soggy) — Ready in 35 Minutes
 Egg Muffins That Don’t Turn Out Soggy or Spongey (High-Protein & Make-Ahead)