
The first time I made these by myself, I was twelve, standing on a step stool in Marta’s kitchen while she watched from the table. She didn’t help. She just said “you’ll know the filling is ready when it holds together without cracking” and let me figure it out. I got it wrong twice before I felt it — that specific resistance when you press it into the egg shape and it stays without crumbling. That’s the version I’m giving you here. The filling that holds its shape, the chocolate shell that snaps clean when you bite into it, and enough peanut butter richness to make everyone forget the store-bought ones exist.
The short version: A no-bake peanut butter filling shaped into eggs and dipped in dark chocolate — ready in under two hours with ingredients you probably already have.
These have been our Easter tradition for three generations now. My daughter Nora, who lives in Savannah and only comes home for holidays, calls me every year the week before Easter to ask if I’m making them. She knows the answer.
- Serves: Makes about 24 eggs (depending on size)
- Hands-On Time: 45 min | Total Time: 2 hours (includes chilling)
- Difficulty: Easier than you think — shaping takes a little patience but no special skills
- Cost per serving: ~$0.60 per egg
- Calories: ~210 per egg
- Dietary Notes: Naturally gluten-free. Easily dairy-free with a butter swap.
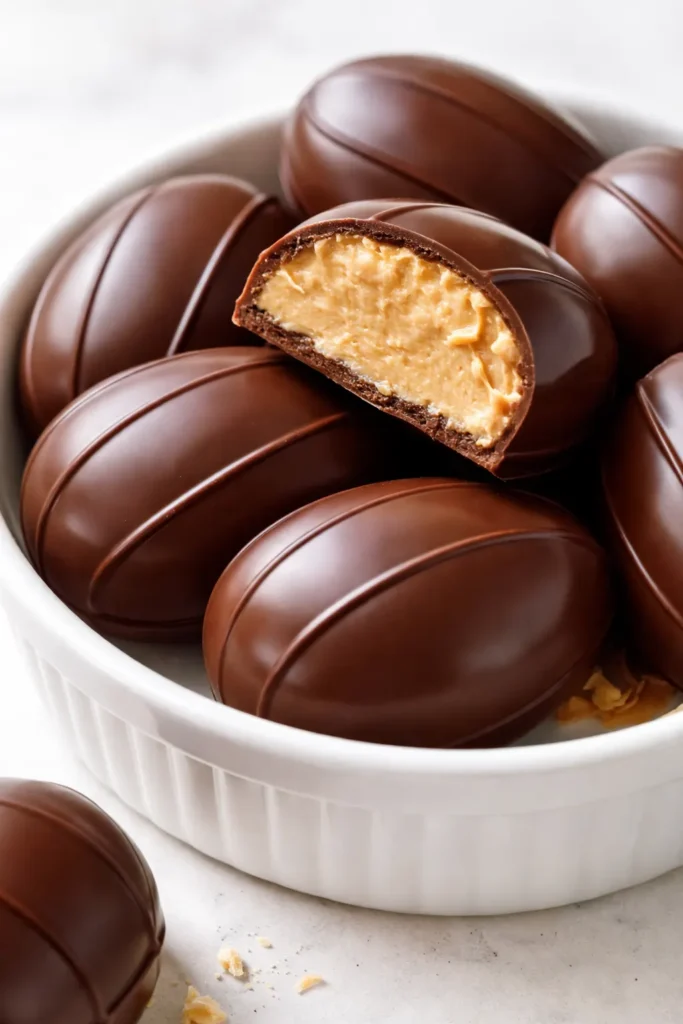
(Photo above: a shallow white ceramic dish piled with a dozen chocolate-dipped peanut butter eggs, some drizzled with extra chocolate, a few with a light dusting of flaky sea salt. Shot from slightly above in late afternoon light — the chocolate has a soft sheen that catches the window light. One egg is broken in half to show the creamy peanut butter filling and thin chocolate shell.)
Why These Are Different From Every Other Version
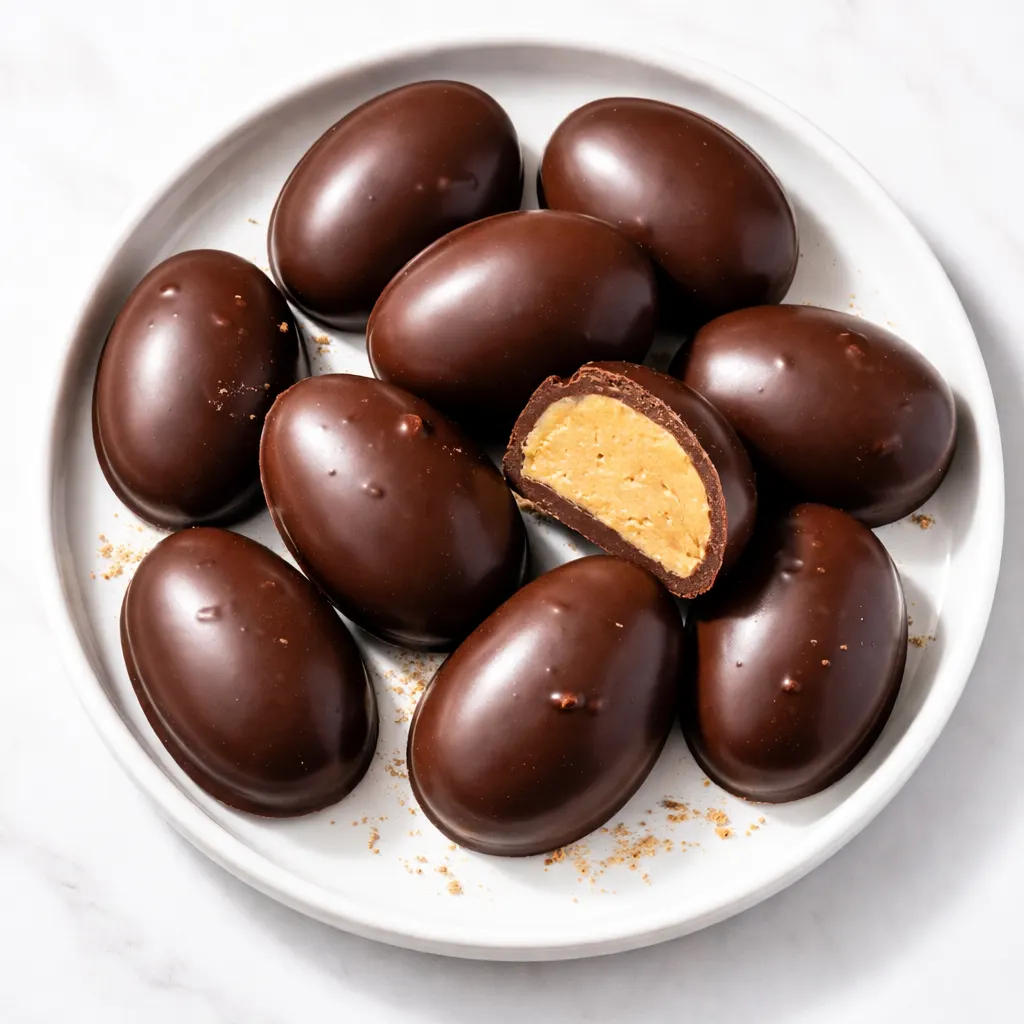
Most homemade peanut butter eggs fall into one of two traps: the filling is either too dry and crumbly — so it cracks when you try to shape it — or too soft and sticky, which means it never firms up properly and the chocolate shell ends up cracking because the filling underneath is still moving. Marta’s version hits the sweet spot because of one thing: the ratio of butter to peanut butter to powdered sugar is exactly balanced so the filling feels like a stiff Play-Doh at room temperature. It holds its shape without being hard, and it softens just slightly once it’s been chilled and the chocolate sets around it.
The other trick is the chocolate itself. You want a thin, snappy shell, not a thick globby coating. That means tempering the chocolate properly — or at least using a good-quality chocolate and a careful double boiler. I’ll walk you through it. The first time I did it wrong I ended up with chocolate that bloomed white streaks in the fridge. Marta took one look and said “well, now you know.”
What you get when you do it right: a shell that cracks clean when you bite into it, a filling that’s creamy but firm, and an Easter treat that tastes like the real thing — not the waxy version from a plastic egg.
Everything You Need (And a Few Notes From Me)
- 1 cup creamy peanut butter: The regular kind — Jif or Skippy or whatever your household uses. Natural peanut butter that separates will make the filling oily and unstable. Save that for your smoothies. My kids genuinely cannot tell the difference between name brand and store brand in this recipe, so buy what works for your budget.
- 6 tablespoons unsalted butter, softened: Room temperature is important here — cold butter won’t incorporate evenly and you’ll end up with little flecks of butter in the filling. Leave it out for at least an hour before you start. Marta used salted butter and just skipped the added salt — do that if it’s what you have.
- 3 cups powdered sugar: Sift it if it’s lumpy. I don’t always sift mine and I get away with it, but if your powdered sugar has been sitting in the cabinet since last Christmas, sift it.
- 1 teaspoon vanilla extract: Pure, not imitation. The difference is noticeable in a no-bake recipe where vanilla is one of only a few flavoring ingredients. I use the bottle I keep for baking — not the one I use for daily cooking.
- Pinch of salt: Only if you’re using unsalted butter. If you’re using salted, skip this.
- 12 ounces dark or semi-sweet chocolate chips or chopped chocolate: I use Ghirardelli 60% cacao chips most of the time. You want something in the 50-70% range — milk chocolate makes the eggs too sweet for my taste, but use what your family likes. Nora prefers semi-sweet. Marta insisted on dark. I make both.
- 1 teaspoon coconut oil or vegetable shortening (optional): This helps the chocolate thin out slightly and gives it a smoother finish. Totally optional but I do it every time.
- Flaky sea salt for finishing (optional): A little sprinkle on top right after dipping — my favorite addition.
What to Pull Out Before You Start
- A medium mixing bowl — glass or ceramic works best, not plastic (plastic can retain a little oil residue that affects the chocolate)
- A hand mixer or stand mixer (you can do this by hand with a wooden spoon if you have strong arms — Marta did)
- A baking sheet lined with parchment or wax paper
- A double boiler or a heatproof bowl set over a saucepan of simmering water
- A fork for dipping
- Optional but helpful: a small offset spatula for smoothing the chocolate
No candy thermometer needed for this one. You’re going by look and feel.
Let’s Make Them (Step by Step)
This goes fast once you get going. Read through once so you know what’s coming — the only part that takes real patience is the shaping, and that’s just practice.
First, prep your workspace: Line a baking sheet with parchment or wax paper. Clear a space in your fridge where the sheet can sit flat. You’ll need about two hours total between chilling the filling and setting the chocolate.
- Make the filling: In a medium bowl, beat the softened butter and peanut butter together with a hand mixer on medium speed until smooth and fully combined — about 1 minute. Add the vanilla and mix again. It should look like a thick, uniform paste. (📸 Photo tip: you’re looking for a smooth, glossy mixture with no streaks of butter — scrape down the sides once.)
- Add the powdered sugar: Add the powdered sugar one cup at a time, mixing on low speed after each addition. Scrape the bowl down between cups. After the third cup, add the pinch of salt if you’re using it. The mixture will go from crumbly to cohesive as you keep mixing. When all the sugar is in, the filling should hold together when you squeeze a handful — not sticky, not crumbly. If it’s too dry to hold together, add 1 teaspoon of milk or cream. If it’s too sticky, add 2 more tablespoons of powdered sugar. I’ve had to adjust both ways depending on the peanut butter brand.
- Shape the eggs: Scoop about 1½ tablespoons of filling (I use a #60 cookie scoop) and roll it into a ball in your palms. Then shape it into an egg — slightly pointed on one end, rounded on the other. Place it on the parchment-lined sheet. Repeat until all the filling is used. You should get about 24 eggs. (📸 Photo tip: each egg should be smooth on the outside, no cracks — if your filling cracks as you shape it, warm it in your hands for a few seconds and try again. The heat from your palms will soften it just enough.)
- Chill the eggs: Place the baking sheet in the refrigerator for at least 45 minutes, or up to 2 hours. The eggs need to be firm before you dip them — if they’re soft, they’ll fall apart in the chocolate. I once skipped this step because I was in a hurry. The result was a disaster — peanut butter filling floating in warm chocolate. Don’t be me.
- Melt the chocolate: About 10 minutes before the eggs are done chilling, set up your double boiler. Fill a small saucepan with about 2 inches of water and bring it to a simmer. Put your chocolate chips (and coconut oil if using) in a heatproof bowl and set it over the saucepan. The bottom of the bowl should not touch the water. Stir the chocolate occasionally until it’s fully melted and smooth. Remove from heat. If you’re in a hurry you can use the microwave — 30-second intervals at 50% power, stirring between each — but the double boiler gives you more control and a smoother finish.
- Check the chocolate temperature (the hand test): Dip a clean finger into the chocolate and touch it to your lower lip. It should feel just barely warm — not hot. If it’s hot, let it cool for a minute or two before dipping. Chocolate that’s too hot will melt the filling and give you a dull, streaky finish. This is the part Marta never needed a thermometer for — she just knew by feel. You’ll learn it too after a batch or two.
- Dip the eggs: Remove the eggs from the fridge. Working one at a time, drop an egg into the melted chocolate. Use a fork to gently roll it until it’s fully coated. Lift it out with the fork, tap the fork gently on the edge of the bowl to let excess chocolate drip off, and carefully slide the egg back onto the parchment sheet. Repeat with all the eggs. Work quickly but carefully — the eggs warm up fast and the chocolate will start to thicken as it cools.
- Add finishing touches: While the chocolate is still wet, sprinkle a little flaky sea salt on top of each egg if you’re using it. You can also drizzle extra chocolate over the top with a spoon for a decorative look, or leave them plain and glossy.
- Set the chocolate: Place the baking sheet back in the refrigerator for 20-30 minutes, until the chocolate is fully set and firm to the touch. Don’t leave them in longer than an hour — condensation can form on the chocolate when you take them out.
How I Make These Ahead for Easter Week
I’ve been doing this long enough to know that Easter morning is chaos — dye is everywhere, someone is hiding eggs, and I’m trying to get a ham in the oven. These are the one thing I make ahead without fail. I do a double batch on the Wednesday before Easter and we’re set through the weekend.
- Fridge: Store in an airtight container layered between parchment paper for up to 2 weeks. They actually get better after a day or two — the filling softens slightly and the flavors meld.
- Freezer: Yes, these freeze beautifully. Place the fully set eggs in a single layer in a freezer-safe container with parchment between layers. Freeze for up to 3 months. Thaw in the fridge overnight or on the counter for about 30 minutes before serving.
- Reheat: No reheating needed — serve them straight from the fridge or let them sit at room temperature for 10-15 minutes for a softer filling. I prefer them fridge-cold for the snappiest chocolate shell.
Things I Wish I’d Known the First Time
- Don’t skip the chill: I know you’re eager. I know you want to eat one immediately. But if the eggs aren’t fully firm when they hit the chocolate, the filling will soften and slump, and you’ll end up with flat blobs instead of eggs. The 45-minute chill is non-negotiable.
- Your hands are the best tool for shaping: I’ve tried using cookie presses, forming them in plastic eggs, all kinds of gadgets. Nothing works as well as your palms. The warmth of your hands helps the filling come together without cracking. If your hands get too sticky, just rinse them in cool water and dry thoroughly before continuing.
- The chocolate thickness matters more than you think: If your chocolate is too thick when you dip, you’ll get a heavy, clunky shell that overpowers the filling. If it’s too thin, you’ll get a patchy coating. The right consistency is like warm maple syrup — it coats the back of a spoon evenly and drips off in a steady ribbon. If it’s too thick, add ½ teaspoon of coconut oil and stir.
- Even if the chocolate blooms (gets white streaks), they’re still edible: It’s just the cocoa butter separating — a temperature thing. It doesn’t affect the taste at all. I’ve brought bloomed eggs to Easter brunch and no one noticed or cared. Marta would say “that’s character.”
Swaps That Actually Work
- Dairy-free: Use a vegan butter substitute (I like Earth Balance buttery sticks) and dairy-free chocolate chips. The filling texture is slightly softer but it works. My sister-in-law is dairy-free and I make these for her every year — she says they’re better than the regular version.
- Crunchy peanut butter version: Use crunchy peanut butter instead of creamy for a little texture in the filling. I do this sometimes for the adults — my kids prefer creamy.
- White chocolate coating: Swap the dark chocolate for white chocolate chips. The sweetness level is much higher but it makes a pretty pastel look for Easter. Add a drop of pink or yellow food coloring to the white chocolate for colored eggs.
- Add-ins: Fold ¼ cup of finely crushed graham crackers or Rice Krispies into the filling for a little crunch. My nephew loves the Rice Krispie version.
- Mini eggs for kids: Use a 1-teaspoon scoop to make tiny eggs — perfect for little hands and portion control. Reduce the chilling time to 30 minutes.
Questions I Get About This Recipe All the Time
Q: Why did my filling crack when I tried to shape it?
A: Ugh, I’ve been there. It usually means the filling is too dry. Add 1 teaspoon of milk or cream and mix it in with your hands. You can also warm the filling slightly by kneading it in your palms — the heat helps it come together. Next time, make sure your butter is fully softened before you start.
Q: Can I make these with natural peanut butter?
A: I wouldn’t recommend it for this recipe. Natural peanut butter that separates separates again in the filling — you’ll end up with oily patches and the texture won’t hold its shape. Stick with the regular processed kind. I know that’s not the trendy answer, but it’s the honest one. If you really want to use natural, you’ll need to add about ¼ cup more powdered sugar and it still won’t be quite the same.
Q: How long do these last? Can I freeze them?
A: They keep in the fridge for up to 2 weeks in an airtight container — though in my house they’re gone in 4 days. Yes, they freeze for up to 3 months. Freeze them flat on a baking sheet first, then transfer to a freezer bag. Thaw in the fridge or on the counter. I make a double batch every year and freeze half for unexpected guests.
Q: What do you serve these with at Easter?
A: Honestly, they’re usually the dessert table star all on their own. But if I’m building a spread, I put them out with fresh berries (the tartness cuts the richness), a cup of good coffee, and maybe some shortbread cookies for contrast. My kids like them crumbled over vanilla ice cream — and honestly, that’s a valid move.
More Recipes My Family Makes on Repeat
If you liked these peanut butter eggs, here are a few others that get the same reaction at our table:
- [INTERNAL LINK PLACEHOLDER: Grandma Marta’s Chocolate Fudge] — The one that sets up perfectly every single time, no candy thermometer required.
- [INTERNAL LINK PLACEHOLDER: No-Bake Peanut Butter Oat Bars] — My go-to when I want that peanut butter-chocolate fix in 15 minutes flat.
- [INTERNAL LINK PLACEHOLDER: Easter Sugar Cookies with Easy Royal Icing] — The cut-and-bake version that doesn’t make a mess of your kitchen.
These eggs show up every year at our house, and I love watching new people try them for the first time — that little pause, then the look up, like “oh, this is the real thing.” That’s the moment I make them for.
If you try them, drop a comment below and let me know how they turned out — I love hearing about your Easter table. And if you make a batch for someone you love, tag me so I can see them.
📌 Homemade peanut butter Easter eggs recipe that actually holds its shape and has a snappy chocolate shell — save it for your Easter dessert table or spring holiday baking.

My Grandmother’s Peanut Butter Easter Eggs – The Ones with the Chocolate Shell That Actually Snaps
Equipment
- Medium Mixing Bowl
- Hand Mixer or Stand Mixer
- Baking Sheet
- Parchment or Wax Paper
- Double Boiler or Heatproof Bowl and Saucepan
- Fork
- Small Offset Spatula (optional)
Ingredients
- 1 cup creamy peanut butter (regular processed kind, not natural)
- 6 tablespoons unsalted butter, softened to room temperature
- 3 cups powdered sugar, sifted if lumpy
- 1 teaspoon pure vanilla extract
- Pinch of salt (omit if using salted butter)
- 12 ounces dark or semi-sweet chocolate chips or chopped chocolate (50-70% cacao)
- 1 teaspoon coconut oil or vegetable shortening (optional, for smoother chocolate)
- Flaky sea salt for finishing (optional)
Instructions
- First, prep your workspace: Line a baking sheet with parchment or wax paper. Clear a space in your fridge where the sheet can sit flat. You’ll need about two hours total between chilling the filling and setting the chocolate.
- Make the filling: In a medium bowl, beat the softened butter and peanut butter together with a hand mixer on medium speed until smooth and fully combined — about 1 minute. Add the vanilla and mix again. It should look like a thick, uniform paste. (Photo tip: you’re looking for a smooth, glossy mixture with no streaks of butter — scrape down the sides once.)
- Add the powdered sugar: Add the powdered sugar one cup at a time, mixing on low speed after each addition. Scrape the bowl down between cups. After the third cup, add the pinch of salt if you’re using it. The mixture will go from crumbly to cohesive as you keep mixing. When all the sugar is in, the filling should hold together when you squeeze a handful — not sticky, not crumbly. If it’s too dry to hold together, add 1 teaspoon of milk or cream. If it’s too sticky, add 2 more tablespoons of powdered sugar. I’ve had to adjust both ways depending on the peanut butter brand.
- Shape the eggs: Scoop about 1½ tablespoons of filling (I use a #60 cookie scoop) and roll it into a ball in your palms. Then shape it into an egg — slightly pointed on one end, rounded on the other. Place it on the parchment-lined sheet. Repeat until all the filling is used. You should get about 24 eggs. (Photo tip: each egg should be smooth on the outside, no cracks — if your filling cracks as you shape it, warm it in your hands for a few seconds and try again. The heat from your palms will soften it just enough.)
- Chill the eggs: Place the baking sheet in the refrigerator for at least 45 minutes, or up to 2 hours. The eggs need to be firm before you dip them — if they’re soft, they’ll fall apart in the chocolate. I once skipped this step because I was in a hurry. The result was a disaster — peanut butter filling floating in warm chocolate. Don’t be me.
- Melt the chocolate: About 10 minutes before the eggs are done chilling, set up your double boiler. Fill a small saucepan with about 2 inches of water and bring it to a simmer. Put your chocolate chips (and coconut oil if using) in a heatproof bowl and set it over the saucepan. The bottom of the bowl should not touch the water. Stir the chocolate occasionally until it’s fully melted and smooth. Remove from heat. If you’re in a hurry you can use the microwave — 30-second intervals at 50% power, stirring between each — but the double boiler gives you more control and a smoother finish.
- Check the chocolate temperature (the hand test): Dip a clean finger into the chocolate and touch it to your lower lip. It should feel just barely warm — not hot. If it’s hot, let it cool for a minute or two before dipping. Chocolate that’s too hot will melt the filling and give you a dull, streaky finish. This is the part Marta never needed a thermometer for — she just knew by feel. You’ll learn it too after a batch or two.
- Dip the eggs: Remove the eggs from the fridge. Working one at a time, drop an egg into the melted chocolate. Use a fork to gently roll it until it’s fully coated. Lift it out with the fork, tap the fork gently on the edge of the bowl to let excess chocolate drip off, and carefully slide the egg back onto the parchment sheet. Repeat with all the eggs. Work quickly but carefully — the eggs warm up fast and the chocolate will start to thicken as it cools.
- Add finishing touches: While the chocolate is still wet, sprinkle a little flaky sea salt on top of each egg if you’re using it. You can also drizzle extra chocolate over the top with a spoon for a decorative look, or leave them plain and glossy.
- Set the chocolate: Place the baking sheet back in the refrigerator for 20-30 minutes, until the chocolate is fully set and firm to the touch. Don’t leave them in longer than an hour — condensation can form on the chocolate when you take them out.
Notes
Related posts:
 High-Protein Overnight Oats That Actually Taste Like Breakfast (Not a Chalky Disaster)
 Mini Quiche Recipe: The Store-Bought Crust Version That Tastes Like You Made It From Scratch
 The Slow Cooker Cowboy Casserole That Saves Tired Weeknights (No Soggy Tots Allowed)
 Quick Lemon Ricotta Pasta for Busy Weeknights: Creamy, Bright, and on the Table in 20 Minutes
 Lemon Garlic Butter Baked Salmon in Foil That’s Ready in 25 Minutes — No Fuss, No Mess
 Lipton Onion Soup Meatloaf for Tuesday Nights: Moist, Savory, and the Only One You’ll Ever Need