
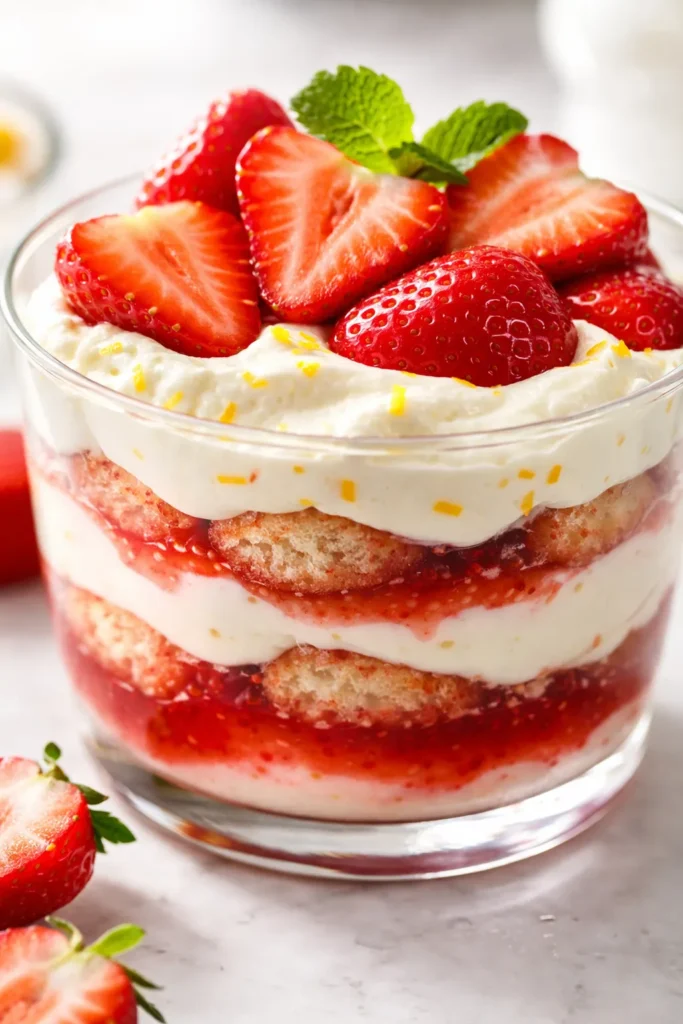
The first time I tried to make a fruit tiramisu, it wept. A sad, watery mess on the plate that collapsed into itself the second I cut into it. This version is the opposite of that. Light, bright, and structured enough to hold a clean slice — it tastes like a perfect June afternoon captured in a dish.
The short version: A no-bake summer dessert with a concentrated strawberry syrup, bright lemon mascarpone cream, and layers of soaked ladyfingers that actually hold their shape.
I spent a full summer testing this while Nora was home from school. We ate tiramisu for breakfast more times than I care to admit. No regrets. She still texts me for the recipe whenever strawberry season rolls around in Savannah.
- Serves: 8-10 as dessert
- Hands-On Time: 35 min | Total Time: 6 hrs 35 min (includes chilling)
- Difficulty: Medium — no special skills, just patience for the layering
- Cost per serving: ~$4.50
- Calories: ~320 per serving
- Dietary Notes: Vegetarian. Can be made gluten-free with GF ladyfingers.
(Photo above: A straight-down shot of the tiramisu in a clear glass dish. The layers of strawberry-soaked ladyfingers and creamy mascarpone are visible through the sides — deep red at the bottom, pale cream in the middle, a final crown of fresh sliced strawberries and a light dusting of powdered sugar. The late afternoon sun catches the edge of the glass just slightly.)
Why This Version Stays Light (And Never Turns Soggy)
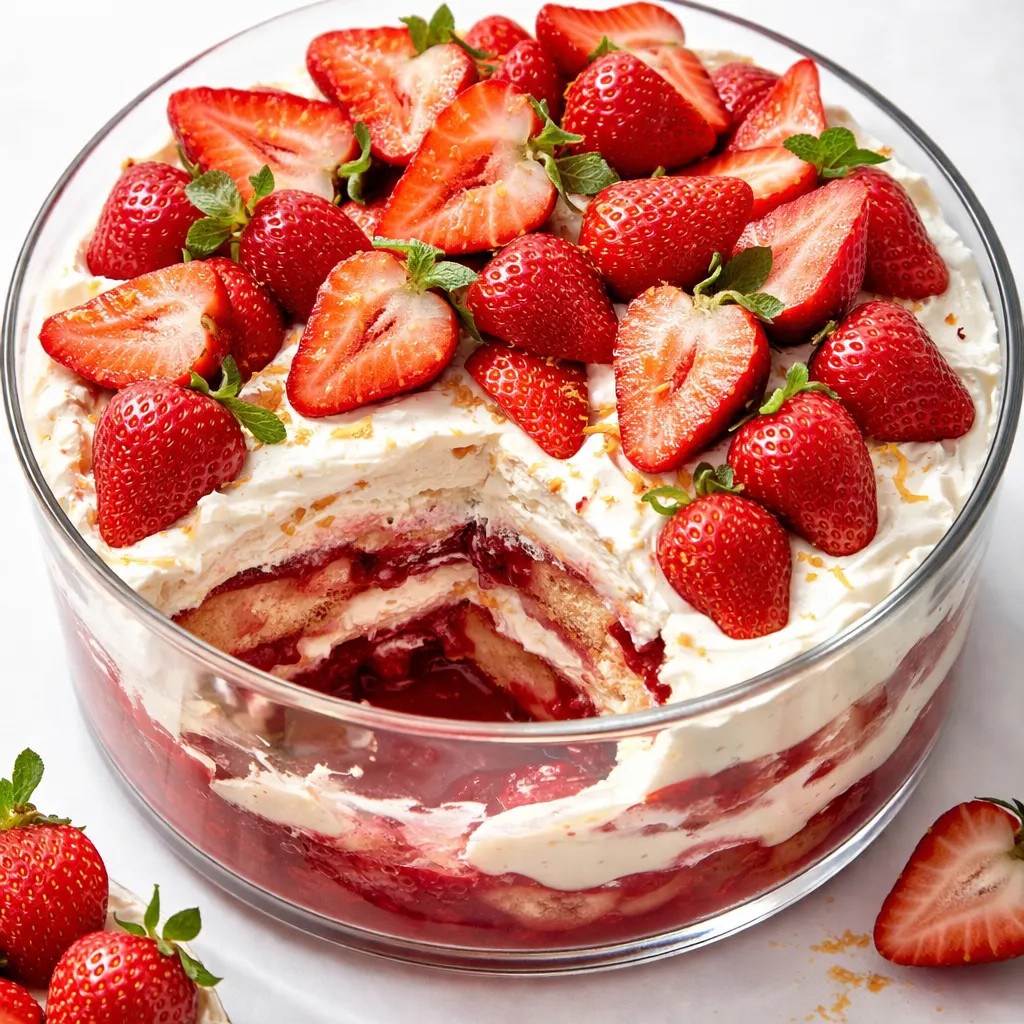
The problem with most fruit tiramisus is water. Strawberries release juice the second you cut into them, and that juice turns the ladyfingers into mush if you’re not careful. I learned this the hard way — Marta’s voice was in my head after that first failed batch saying “too much liquid, Heid.” She was right.
The fix is cooking the berries first. You macerate them with a little sugar, then cook them down into a concentrated syrup. It sounds like an extra step, but it’s the thing that saves the whole dessert. You lose a little volume in the pan, but you gain everything in flavor and texture. The ladyfingers stay firm, the cream stays clean, and the strawberry taste is so concentrated it hits you right in the front of your mouth the second you take a bite.
The lemon zest in the mascarpone cream is the other piece of this. It cuts through the sweetness and keeps every single bite bright enough that you want another one immediately.
Ingredients Worth Talking About
- 2 lbs fresh strawberries (plus extra for topping): The good ones. If they smell like nothing at the store, they’ll taste like nothing in the dish. I use local berries when I can get them — they’re worth the trip.
- 16 oz mascarpone cheese: I pay a little more for the one in the tub by the specialty cheeses. The shelf-stable boxes work in a pinch but the texture is thinner. My family can taste the difference.
- 2 (7-oz) packages savoiardi ladyfingers: The crisp Italian kind, not the soft sponge cake. You want ones that can absorb the syrup without disintegrating.
- 2 large lemons: Zest and juice. The zest goes into the cream, the juice goes into the strawberry syrup. This is the backbone of the whole cream layer — do not skip it.
- 4 large eggs: For the zabaglione-style base. Use the freshest eggs you can find since they’re not cooked beyond the warm bath of the sugar and yolks.
- ¾ cup granulated sugar (divided): ¼ cup for the strawberries, ½ cup for the cream.
- 1 tsp vanilla extract: Real vanilla, not imitation. It matters here where the flavors are simple.
- 1 cup heavy cream: Cold from the fridge. This gets whipped and folded into the mascarpone to lighten everything.
What to Pull Out Before You Start
- A 9×13 baking dish (glass or ceramic works best so you can see the layers)
- A medium saucepan
- A fine-mesh sieve
- A stand mixer or hand mixer
- A large mixing bowl and a medium mixing bowl
- Rubber spatula for folding
Let’s Make It — Step by Step
Read through once before you start. The actual steps go fast — it’s the chilling that does the heavy lifting here.
Prep the strawberries first:
- Hull and quarter: Rinse the strawberries, pat them dry, and quarter them. Toss them with ¼ cup of sugar and the juice of 1 lemon in a bowl. Let them sit for 15 minutes at room temperature — they’ll release a shocking amount of juice. (📸 Photo tip: you should see a pool of dark red liquid forming at the bottom of the bowl. That’s your flavor.)
- Cook down: Pour the berries and their juices into a medium saucepan over medium heat. Bring to a simmer, then reduce the heat to low and let it cook for 12-15 minutes, stirring occasionally. The berries will break down and the liquid will reduce into a syrup that coats the back of a spoon. (📸 Photo tip: When you drag your finger across the back of the spoon and the syrup holds the line for a second, it’s ready. The kitchen will smell like summer condensed into ten seconds.)
- Strain: Pour the mixture through a fine-mesh sieve into a bowl, pressing gently on the solids. Discard the solids. Set the syrup aside to cool completely. I put mine in the fridge to speed it up.
While the syrup cools, make the cream:
- Egg yolks and sugar: Separate the eggs. Put the yolks in a large heatproof bowl (save the whites for another use — I freeze mine for omelets). Add ½ cup of sugar. Whisk them together until they’re pale and thick, about 3 minutes with a hand mixer or 5 by hand.
- Warm the yolks: Set the bowl over a pot of barely simmering water (make sure the bottom of the bowl isn’t touching the water). Whisk constantly for 4-5 minutes until the mixture is warm to the touch and thickened. This is the old-fashioned zabaglione method — it makes the cream stable and silky.
- Add mascarpone and lemon: Remove from heat. Let it cool for 2 minutes, then add the mascarpone, vanilla, and the zest of both lemons. Whisk until smooth. Set aside.
- Whip the cream: In a separate bowl, whip the heavy cream to soft peaks — when you lift the whisk, the cream should droop slightly but hold its shape. Fold the whipped cream into the mascarpone mixture with a rubber spatula. Fold gently, in broad strokes, until there are no white streaks left.
Layer it up:
- Quick dip: Pour the cooled strawberry syrup into a wide, shallow bowl. Working one at a time, dip each ladyfinger into the syrup for about 2 seconds per side. No longer. I’m serious about this — a quick dunk, not a swim. The ladyfinger should feel moist but still firm in your hand. I learned this the hard way after my first batch turned to paste.
- First layer: Arrange the dipped ladyfingers in a single layer in the bottom of your 9×13 dish. Break a ladyfinger in half if you need to fill a gap at the end. Spread half of the mascarpone cream evenly over the top.
- Second layer: Dip the remaining ladyfingers and arrange them on top of the cream. Spread the rest of the mascarpone cream over the top.
- Top: Thinly slice the reserved fresh strawberries and arrange them over the cream in whatever pattern makes you happy. I do concentric circles because I’m that person. Cover tightly with plastic wrap.
How I Meal Prep This for the Week
This is one of those desserts that genuinely gets better on day two, so I make it the day before I need it. I do a double batch when the berries are at their peak and we eat it over a few days — it never lasts longer than that.
- Fridge: Covered tightly, for up to 3 days. The texture is best on days 1 and 2. By day 3 the ladyfingers have softened a bit more, but it’s still delicious.
- Freezer: I don’t recommend it. The mascarpone cream gets grainy when thawed, and the strawberries release too much water. Make it fresh or make it a day ahead.
- Reheat: None needed! Serve cold, straight from the fridge. If you’ve made it ahead, let it sit at room temperature for 10 minutes before cutting so the cream softens slightly.
My Honest Advice After Making This a Dozen Times
- The ladyfinger dip is the most important part: A quick dunk, not a swim. I cannot overstate this. Two seconds per side. The first time I made this, I held them in there for five seconds thinking “more flavor” and ended up with a casserole of mush. Trust me on this one.
- Let the syrup cool completely: Warm syrup turns the ladyfingers to paste immediately. I stick the bowl of syrup in the fridge for about 20 minutes while I make the cream. Cold syrup, quick dip, perfect texture.
- Strain the seeds: I know it’s an extra step, but nobody wants strawberry seeds stuck in their teeth at a dinner party. The fine-mesh sieve catches them all and the texture of the cream stays smooth.
- Chill it fully: Six hours is the minimum. Overnight is better. The layers need time to settle into each other. If you cut it too early, the slices will slide apart on the plate. I’ve done it. It still tastes good, but it looks much better with the full chill.
Swaps That Actually Work
- Gluten-Free: Use gluten-free ladyfingers. The rest of the recipe is naturally gluten-free. I’ve tested this with the Schär brand and it works beautifully.
- Lighter version: Swap half the mascarpone for full-fat Greek yogurt. You lose a little richness but gain a pleasant tang. My husband actually prefers this version — he says it’s “less heavy.” I make both depending on who’s coming over.
- Mixed berries: Use half strawberries, half raspberries or blackberries. The raspberries break down beautifully in the syrup. My kids love when I add blueberries to the top layer — they pop in your mouth.
- Lemon curd layer: Spread a thin layer of lemon curd on the ladyfingers before the cream in the middle layer. It’s extra work, but it’s the version I make for Easter every year.
Questions I Get About This Recipe All the Time
Q: Why did my mascarpone cream curdle?
A: Ugh, I’ve been there. It usually happens when the mascarpone is too cold when you mix it with the egg yolks, or when you overmix it. Let everything come to room temperature next time. If it does curdle slightly, you can sometimes save it by folding in a tablespoon of cold heavy cream. If it’s really bad, start fresh with a cool bowl — the ingredients aren’t that expensive, and it’s worth doing right.
Q: Can I use frozen strawberries?
A: Yes, but thaw them completely and drain off the excess liquid before you macerate them. You won’t get quite the same bright flavor as fresh, but it’ll still be good. I do this in the winter when I’m craving summer and the berries at the store look sad.
Q: How far in advance can I make this?
A: You can make it up to three days ahead. I prefer making it the day before — the layers have time to settle but the ladyfingers still have a little structure left. If you make it three days out, the texture will be softer, more like a pudding. That’s not a bad thing, but it’s different.
Q: What do you serve with it?
A: A cup of strong black tea or a glass of cold Prosecco. If the weather is warm, we eat it on the front porch with nothing else. My kids like it with a dollop of extra whipped cream on top, but I think it’s rich enough on its own.
More Recipes My Family Makes on Repeat
If you liked this one, here are a few others that get the same reaction at our table:
- [INTERNAL LINK PLACEHOLDER: Classic Tiramisu] — The original version with coffee and cocoa. Dark, rich, and the one Nora requests for her birthday every year.
- [INTERNAL LINK PLACEHOLDER: Lemon Blueberry No-Bake Cheesecake] — Another summer no-bake. Creamy, tart, and topped with a blueberry compote that takes about 10 minutes.
- [INTERNAL LINK PLACEHOLDER: Fresh Berry Pavlova] — A showstopper with a crisp shell and marshmallow center. I bring this to every Fourth of July picnic.
When I brought this strawberry tiramisu to a family dinner last June, my sister-in-law asked for the recipe before she’d even finished her first bite. That’s the kind of dessert this is — impressive enough for a gathering, simple enough for a Tuesday when you just need something beautiful. If you make it, drop a comment below and let me know how it went. I love hearing about it.
📌 Save this strawberry tiramisu recipe for your next spring brunch or summer dinner party — it’s a no-bake dessert that actually stays firm and tastes like fresh, ripe berries.
Strawberry Tiramisu with Lemon Mascarpone Cream
Equipment
- 9×13 Baking Dish
- Medium Saucepan
- Fine-mesh Sieve
- Stand mixer or hand mixer
- Mixing Bowls
- Rubber spatula
Ingredients
Strawberry Syrup
- 2 lbs fresh strawberries (plus extra for topping)
- 1/4 cup granulated sugar
- 1 lemon (juiced)
Mascarpone Cream
- 16 oz mascarpone cheese
- 2 packages (7 oz each) savoiardi ladyfingers
- 2 large lemons (zest and juice)
- 4 large eggs
- 1/2 cup granulated sugar
- 1 tsp vanilla extract
- 1 cup heavy cream
Topping
- Fresh strawberries, sliced
Instructions
- Hull and quarter the strawberries. Toss with 1/4 cup sugar and juice of 1 lemon. Let sit 15 minutes until they release juice.
- Cook the berry mixture in a saucepan over medium heat until simmering, then reduce to low and cook 12-15 minutes until syrupy and reduced.
- Strain through a fine-mesh sieve, pressing on solids. Discard solids. Cool the syrup completely (can refrigerate).
- Separate eggs. In a heatproof bowl, whisk yolks with 1/2 cup sugar until pale and thick, about 3-5 minutes.
- Place bowl over a pot of barely simmering water (bowl not touching water). Whisk constantly for 4-5 minutes until warm and thickened (zabaglione).
- Remove from heat. Let cool 2 minutes, then whisk in mascarpone, vanilla, and zest of both lemons until smooth.
- In a separate bowl, whip heavy cream to soft peaks. Fold into mascarpone mixture gently until no white streaks remain.
- Pour cooled strawberry syrup into a shallow bowl. Dip each ladyfinger for about 2 seconds per side (no longer). Arrange in a single layer in a 9×13 dish.
- Spread half the mascarpone cream over the ladyfinger layer.
- Dip remaining ladyfingers and arrange on top. Spread remaining cream evenly.
- Thinly slice extra strawberries and arrange on top. Cover with plastic wrap and refrigerate for at least 6 hours, preferably overnight.
Notes
Related posts:
 The Slow Cooker Cowboy Casserole That Saves Tired Weeknights (No Soggy Tots Allowed)
 Lemon Garlic Butter Baked Salmon in Foil That’s Ready in 25 Minutes — No Fuss, No Mess
 Moist Chocolate Zucchini Bread That Doesn’t Turn Out Rubbery — Finally
 Creamy Homemade Strawberry Dole Whip (That Tastes Just Like the Real Thing)
 Blueberry Peach Bread That Doesn’t Sink or Turn Mushy — Finally
 Quinoa Chicken Sausage Bowls That Are Ready in 30 Minutes (And Actually Keep Well)