
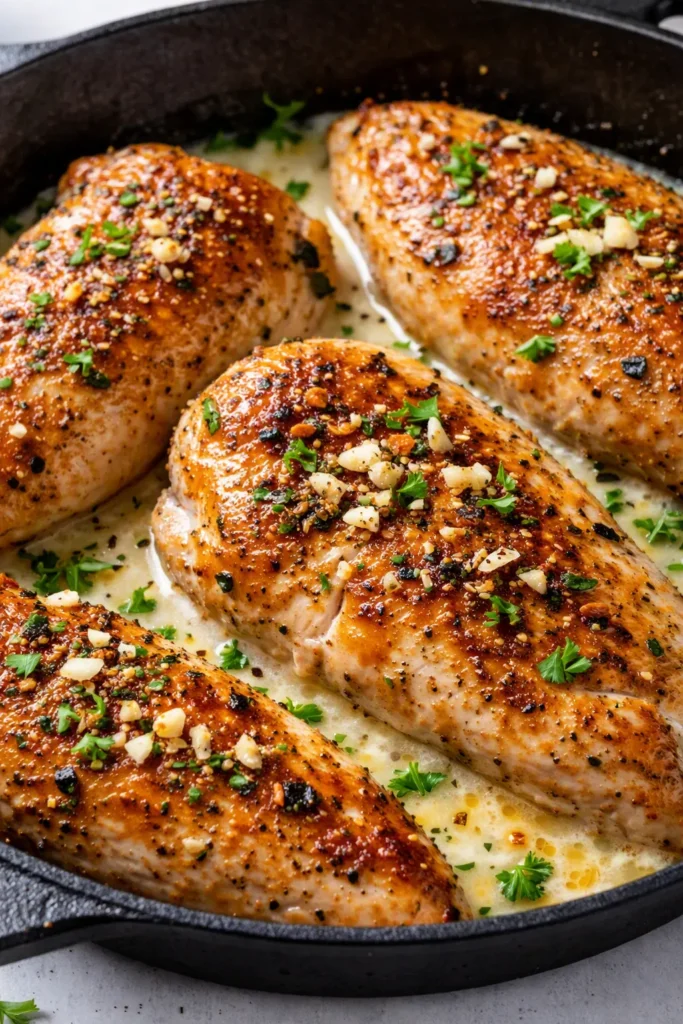
Full disclosure: my first attempt at creamy ranch chicken was rough. The chicken had the texture of a well-worn dish towel, and the sauce looked like something that had curdled out of spite. I don’t share that to scare you off — I share it because if you’ve had the same thing happen in your kitchen, I need you to know this version is different. This creamy ranch chicken comes together in a single skillet, the sauce turns out glossy and smooth every time, and the chicken stays juicy even when dinner lands on the table at 7pm on a school night.
The short version: One skillet, 30 minutes, and a sauce so good my kids ask for extra bread just to dip in it.
I’ve made this every other week for the past year, and it’s the recipe my daughter Nora calls home about when she’s homesick in Savannah. If that’s not a recommendation, I don’t know what is.
- Serves: 4 as a main
- Hands-On Time: 15 min | Total Time: 30 min
- Difficulty: Easy enough for a school night
- Cost per serving: About $3.50
- Calories: ~430 per serving
- Dietary Notes: Naturally low-carb; easily made gluten-free
(Photo above: overhead shot of the finished creamy ranch chicken in a well-seasoned cast iron skillet, the pale golden sauce pooling around seared chicken breasts with deep brown edges, a scatter of fresh parsley and chives on top, a linen napkin and crusty bread beside the pan, warm late-afternoon light coming from the kitchen window.)
The Secret to Keeping the Chicken Juicy (and the Sauce Smooth)
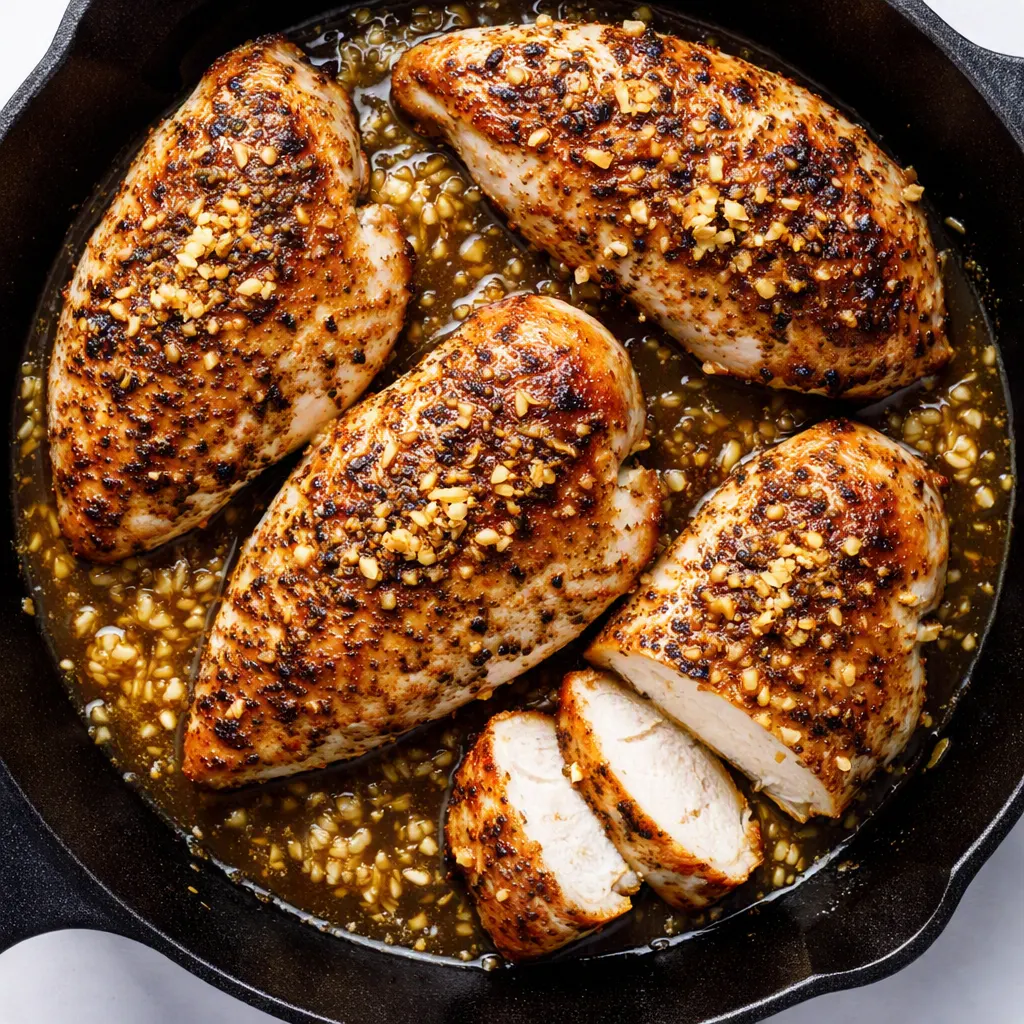
The first mistake most recipes make is leaving the chicken in the pan the whole time. All that simmering turns a perfectly good chicken breast into something that fights back when you cut into it. Here, you sear the chicken just until it’s golden on both sides, then pull it out of the pan while you build the sauce. It goes back in at the very end, just long enough to heat through and soak up all that ranch flavor. The chicken finishes cooking gently in the warm sauce instead of boiling away in it the whole time.
The second thing that makes this work is a small amount of cream cheese in the sauce. It melts into the cream and broth and gives you a thick, glossy texture without a single lump. I tried this with heavy cream alone once and the sauce was so thin it ran right off the chicken and pooled at the bottom of the plate like a puddle. I tried it with flour and ended up with something that tasted like library paste. The cream cheese is the sweet spot, and I’m never going back.
The payoff is exactly what you want at the end of a long day: tender chicken in a rich, herby sauce that coats the back of a spoon and makes the whole kitchen smell like somebody did a lot more work than you actually did.
Ingredients That Matter (And the Notes I’d Say Out Loud)
- 1½ pounds boneless, skinless chicken breasts (about 3–4 breasts): You want them all around the same thickness so they cook evenly. If they’re on the thick side, lay them flat, cover with plastic wrap, and give them a few gentle whacks with a rolling pin until they’re about ¾-inch thick. This is the step I skip when I’m in a hurry, and then I regret it when one breast takes twice as long as the others. The pounding takes thirty seconds and saves you a world of frustration.
- 1 packet (about 1 ounce) ranch seasoning mix — or 3 tablespoons of a homemade blend: This is where all the flavor comes from, so don’t skip it. The packet is perfectly fine, but if you want to control the salt or you’ve got a picky eater who’s sensitive to certain flavors, make your own with dried buttermilk, parsley, dill, chives, garlic powder, and onion powder. I keep a jar of my own blend on the counter and reach for it constantly.
- 1 tablespoon olive oil + 1 tablespoon butter: The oil keeps the butter from burning, and the butter gives you a golden-brown crust and a flavor that plain oil just can’t match. They work as a team here.
- 2 cloves garlic, minced: Add it right after the chicken comes out of the pan, and let it cook just until it smells like garlic — about 30 seconds. The second it shifts from fragrant to that sharp, bitter aroma, you’ve gone too far. Your nose is the timer here.
- ½ cup chicken broth: This deglazes the pan and picks up all those browned bits that are carrying the real flavor. Use low-sodium so you can control the salt yourself.
- 1 cup heavy cream: The backbone of the sauce. Cold cream can shock the pan and make the sauce seize up, so I set it out on the counter while the chicken cooks and let it come to room temperature.
- 2 ounces cream cheese, softened: Cut it into small pieces before you start and let it warm up too. I’ve thrown it in cold before — it gets lumpy and takes forever to melt. Room temperature is the difference between a smooth sauce and one that makes you wonder what went wrong.
- Fresh parsley or chives for topping: Not just for looks. The freshness cuts through the richness and makes the whole dish taste brighter. My kids call it “the green sprinkle stuff,” and they notice when I skip it.
What to Pull Out Before You Start
- A 12-inch skillet — cast iron or heavy stainless steel. If you don’t have either, a good nonstick skillet will work, though you won’t get quite as much browning on the chicken.
- A meat thermometer if you have one. I’ll give you the visual cue too, so don’t stress if you don’t own one.
- Measuring cups for the broth and cream.
- A whisk — this is what keeps the sauce smooth and lump-free.
- A wooden spoon or silicone spatula for scraping up the browned bits.
That’s genuinely it. No special equipment, no fancy gadgets, nothing you have to order online and wait three days for.
Let’s Make It (Step by Step)
This moves faster than you’d think, so give it a quick read before you even turn on the stove. Most of these steps take a minute or less — the whole thing goes from fridge to table in right around half an hour.
- Prep the chicken: Lay the chicken breasts on a cutting board and pat them dry with paper towels. If they’re unevenly thick, pound them to about ¾ inch. Season both sides with salt and pepper, then sprinkle the ranch seasoning evenly over every piece, pressing it in gently so it stays put. Let them sit for five minutes before cooking — this gives the seasoning a chance to actually flavor the meat instead of just dusting the outside.
- Heat the skillet: Add the olive oil and butter to the skillet and set it over medium-high heat. When the butter is fully melted and starting to sizzle — but not browning — lay the chicken in the pan in a single layer. It’s fine if the pieces are snug; just don’t crowd them so much that they’re touching on all sides. (📸 Photo tip: Within the first couple of minutes, you should see the edges turning pale golden. If the chicken is just steaming and releasing water instead of browning, the pan wasn’t hot enough. It’ll still taste good — you just won’t get that deep crust.)
- Sear the chicken: Cook for 4–5 minutes without moving the pieces. This is the hardest part of the whole recipe, I know — the urge to peek and flip is real. Let it go. When you flip them, you want a deep golden-brown crust that releases easily from the pan. Cook the other side for 4–5 minutes more. Transfer the chicken to a plate and leave all those drippings in the pan — that’s flavor you didn’t pay extra for.
- Cook the garlic: Lower the heat to medium, add the minced garlic, and stir it around in the pan for about 30 seconds. The smell is your cue — the moment it turns from raw and sharp to that warm, sweet garlic fragrance, you’re ready for the next step. Don’t walk away during this part.
- Deglaze the pan: Pour in the chicken broth and scrape the bottom of the skillet with your wooden spoon or spatula. Those browned bits loosen up into the liquid, and that’s where so much of the flavor lives. Let it bubble for about a minute, until it reduces by about a third. (📸 Photo tip: The liquid should be simmering gently, and the bottom of the pan should look clean — no stubborn crust left behind. If you see a few bits still stuck, keep scraping; they’ll release as the broth bubbles.)
- Build the sauce: Reduce the heat to low and pour in the heavy cream. Add the cream cheese pieces and whisk gently until everything is fully melted and smooth. The sauce will look fairly thin at this point — don’t panic. It thickens as it reduces and as the chicken finishes cooking in it. This is also the moment to taste it and adjust — maybe a few grinds of black pepper, maybe a pinch of salt if your ranch seasoning is on the mild side.
- Return the chicken: Nestle the chicken pieces back into the skillet, along with any juices that collected on the plate. Spoon some of the sauce up over the top of each piece so they’re coated. Cover the skillet and let it cook for 5–7 more minutes, until the chicken is cooked through. The visual cue: press the thickest part of a breast with your finger — it should spring back rather than feeling squishy. If you have a thermometer, you’re looking for 165°F in the thickest part.
- Rest and serve: Turn off the heat, uncover, and let it sit for 5 minutes before serving. I know you want to dig in — I always do too. But this short rest is what lets the juices settle back into the meat instead of running out onto the plate the second you cut into it. Spoon extra sauce over each piece, shower with the fresh herbs, and put the skillet right on the table. That’s the way we do it, anyway.
Make-Ahead Notes (Because We’re All Busy)
I make a double batch on Sundays and we eat it for two nights. Honestly, the sauce tastes even better the second day, once the flavors have had time to settle in together like old friends. When I know we’re going to have leftovers, I cook the chicken a little less on the first night so reheating doesn’t dry it out.
- Fridge: Store in an airtight container for up to 3 days. Reheat over low heat on the stovetop, stirring occasionally, and add a splash of broth or milk if the sauce has thickened too much overnight.
- Freezer: Yes, it freezes well for up to 2 months. The sauce might look a little separated when it thaws — that’s normal with cream. A gentle reheat on the stove with a quick whisk brings it right back together.
- Reheat: The microwave works in a pinch — use 50% power and stir halfway through. The stovetop is better if you have five extra minutes, because the sauce keeps its silky texture instead of turning slightly grainy.
Things I Wish I’d Known the First Time
- Patience with the sear: The chicken will stick to the pan if you try to flip it too early. Give it the full 4–5 minutes. When it’s ready, it releases almost on its own — that’s how you know the crust has formed. If it’s still stuck, it’s not done. Give it another minute and try again.
- Don’t trust the timer for the sauce: The sauce is done when it coats the back of a spoon and a line drawn through it with your finger stays put. That texture check tells you more than any cooking time could. If it’s not there yet, let it bubble gently uncovered for a few more minutes and check again.
- Taste before you salt: Ranch seasoning is salty, and it varies a lot between brands. Always taste the sauce before you add any salt. I oversalted this exactly once, and it ruined a perfectly good pan of dinner. My husband was kind about it, but we both knew what had happened.
- It’s forgiving: If the sauce gets too thick, whisk in a splash of warm broth. If it’s too thin, let it bubble uncovered for a few extra minutes. If you accidentally leave the chicken in the pan a couple minutes too long, it’s still going to be fine. This is a dinner that wants you to succeed, even on the nights when you’re exhausted and measuring with your heart.
Swaps That Actually Work
- Dairy-Free: Use full-fat canned coconut milk instead of the heavy cream, and a dairy-free cream cheese alternative. It won’t be quite as thick as the original, but the flavor holds up beautifully. This is the version I make when my sister-in-law comes to dinner, and she always asks for seconds.
- Chicken thighs: If you prefer dark meat, use the same amount of boneless, skinless thighs. They’re even more forgiving than breasts — almost impossible to dry out, honestly — and they take a couple of minutes less to cook. I’ve used them many times when that’s what I had in the fridge, and the recipe doesn’t miss a beat.
- Spicy version: Add a pinch of cayenne or a finely chopped jalapeño in with the garlic. I do this when I’m making a grown-up dinner after the kids are in bed. They get the mild version; I put a little extra heat in mine. Everyone wins.
- Make it a full meal: Toss in a handful of sliced mushrooms with the garlic, or stir in a cup of frozen peas right at the end and let them warm through in the sauce. Both cook quickly and turn this into a complete one-pan dinner without changing anything else.
Questions I Get About This Recipe All the Time
Q: Why did my sauce turn out grainy or separated?
A: Ugh, I’ve been there. The most common culprit is putting cold cream or cold cream cheese into a hot pan. That temperature shock makes the fat separate, and no amount of whisking will fix it once it’s happened. Let both come to room temperature before you start, and keep the heat low when you add them. If it happens anyway, pull the pan off the heat, add a splash of room-temperature cream, and whisk hard — it’s saved a couple of my dinners before.
Q: Can I use chicken thighs instead of chicken breasts?
A: Yes, absolutely — boneless, skinless thighs work great and are honestly more forgiving than breasts. Use the same amount, follow the same steps, and expect them to cook a few minutes faster. If you like your meat with a little more fat and flavor, thighs are the way to go.
Q: How long does creamy ranch chicken last in the fridge? Can I freeze it?
A: It’ll keep in an airtight container in the fridge for up to 3 days. For freezing, it’s good for about 2 months — just know that the cream sauce may look separated after it thaws. Reheat it gently on the stove over low heat, whisking as it warms, and it should come back together nice and smooth. Add a splash of broth if it needs help loosening up.
Q: What do you serve with creamy ranch chicken?
A: We do it over rice more often than anything else, because the sauce just sinks right in. Buttered egg noodles are a close second. When we’re keeping it lower-carb, I serve it with roasted green beans or a simple side salad. And my kids always demand something for dipping — crusty bread or warm dinner rolls straight from the oven. They call it “the good sauce,” and honestly, they’re not wrong.
More Recipes My Family Makes on Repeat
If this one hits the spot for you, here are a few others that get the same reaction at our table:
- Crockpot Creamy Italian Chicken — set it in the morning and come home to dinner already done.
- Chicken Alfredo Skillet — the same cozy comfort without the fuss of a big pasta pot.
- Sheet Pan Ranch Chicken and Potatoes — the easiest way to get a whole dinner on the table with just one pan to wash afterward.
This creamy ranch chicken is the recipe I make when I don’t have the energy for anything complicated but I still want my family to sit down to something that feels like a real meal. It works on school nights, it works when the house is cold, and it works when you just want something creamy, herby, and warm at the end of a long day.
If you make it — and I hope you do — drop a comment below and let me know how it went for y’all. I love hearing which variations your family liked and which ones you’ll be making again.
📌 This creamy ranch chicken recipe keeps the chicken juicy and the sauce silky-smooth — save it for your next busy weeknight dinner when you need something that works the first time.
Creamy Ranch Chicken That Doesn’t Dry Out
Equipment
- 12-inch cast iron skillet
- Meat Thermometer (Optional)
- Whisk
- Wooden spoon or silicone spatula
Ingredients
- 1 1/2 pounds boneless, skinless chicken breasts (about 3-4 breasts)
- 1 packet ranch seasoning mix (about 1 ounce), or 3 tablespoons homemade blend
- 1 tablespoon olive oil
- 1 tablespoon butter
- 2 cloves garlic, minced
- 1/2 cup low-sodium chicken broth
- 1 cup heavy cream, at room temperature
- 2 ounces cream cheese, softened and cut into small pieces
- Fresh parsley or chives, chopped, for topping
- to taste salt and freshly ground black pepper
Instructions
- Pat the chicken dry and pound to an even 3/4-inch thickness if needed. Season both sides with salt and pepper, then sprinkle with ranch seasoning, pressing it in gently. Let sit for 5 minutes before cooking.
- Heat olive oil and butter in a 12-inch skillet over medium-high heat. When the butter is melted and sizzling but not browning, lay the chicken in a single layer.
- Sear the chicken without moving it for 4-5 minutes, until the underside releases easily and is deep golden brown. Flip and cook the other side 4-5 minutes more. Transfer to a plate, leaving the drippings in the pan.
- Lower the heat to medium and add the minced garlic. Cook just until fragrant, about 30 seconds — your nose is the timer here.
- Pour in the chicken broth and scrape the bottom of the skillet to loosen the browned bits. Let it bubble for about a minute, until reduced by about a third.
- Reduce heat to low and pour in the heavy cream. Add the cream cheese pieces and whisk gently until smooth. Taste and adjust with black pepper or a pinch of salt.
- Return the chicken and any accumulated juices to the skillet, spooning sauce over the top. Cover and cook 5-7 minutes, until the chicken springs back when pressed or hits 165°F in the thickest part.
- Turn off the heat, uncover, and let rest 5 minutes before serving. Spoon extra sauce over the chicken, shower with fresh herbs, and serve straight from the skillet.
Notes
Related posts:
 The Slow Cooker Cowboy Casserole That Saves Tired Weeknights (No Soggy Tots Allowed)
 Quick Lemon Ricotta Pasta for Busy Weeknights: Creamy, Bright, and on the Table in 20 Minutes
 Lemon Garlic Butter Baked Salmon in Foil That’s Ready in 25 Minutes — No Fuss, No Mess
 Lipton Onion Soup Meatloaf for Tuesday Nights: Moist, Savory, and the Only One You’ll Ever Need
 Kielbasa Sausage Cheesy Potato Casserole That Tastes Like Sunday Dinner — In Under an Hour
 Quinoa Chicken Sausage Bowls That Are Ready in 30 Minutes (And Actually Keep Well)